Lights
Introduction
Section titled “Introduction”This chapter contains information on the following subjects:
- Warning and indicator lamps
- Turn signal and main beam lever
- Switching the lights on and off
- Functions - lights and vision
- Masking or adjusting the headlights (touring mode)
- Headlight range control, instrument and switch lighting
- Interior lighting and reading lights
Observe the national legal requirements on the use of the vehicle lights.
Additional information and warnings:
Section titled “Additional information and warnings:”Indicator lamps
Section titled “Indicator lamps”First read and observe the introductory information and safety warnings .
Indicator lamps in the instrument cluster
Section titled “Indicator lamps in the instrument cluster”Lights up | Possible cause | Solution |
|---|---|---|
Driving lights completely or partially faulty | Renew the relevant bulb ⇒ Changing a bulb If all the bulbs are working, visit a qualified workshop if necessary. | |
Rear fog light switched on | ⇒ Fog lights. | |
Left or right turn signal. The indicator lamp flashes at twice the normal rate if a turn signal on the vehicle or the trailer is faulty. | Check the vehicle and trailer lights if necessary. | |
Main beam switched on or headlight flasher operated |
Some warning and indicator lamps light up for a function check when the ignition is switched on. They go out after a few seconds.
Indicator lamps in light switch
Section titled “Indicator lamps in light switch”Lights up | Possible cause | Solution |
|---|---|---|
Front fog lights switched on. | ||
Side lights switched on. |
Turn signal and main beam lever
Section titled “Turn signal and main beam lever”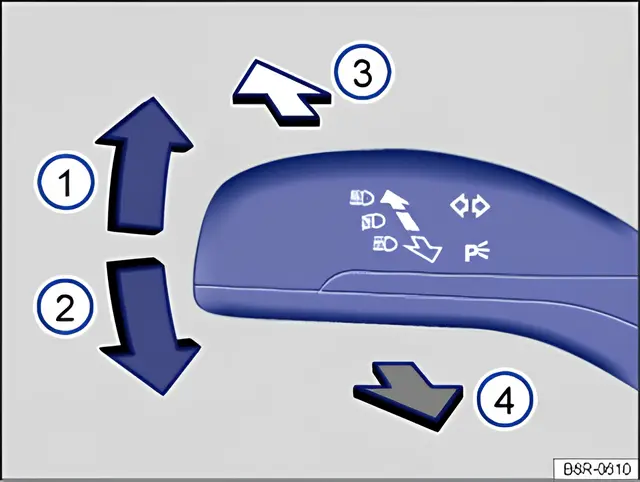
Fig. 68 Turn signal and main beam lever
First read and observe the introductory information and safety warnings .
Move the turn signal and main beam lever to the required position:
- Right turn signal switched on ⇒ . With the ignition switched off, right parking light ⇒ Parking light.
- Left turn signal flashing ⇒ . With the ignition switched off, left parking light ⇒ Parking light.
- Switching on the main beam ⇒ . The indicator lamp in the instrument cluster lights up when the main beam is switched on.
- Operating the headlight flasher. The headlight flasher is on for as long as the turn signal and main beam lever is held. The indicator lamp lights up.
Return the turn signal and main beam lever to its basic position to switch the function off.
Lane change flash
Section titled “Lane change flash”To use the lane change signal, move the turn signal and main beam lever up or down only as far as the resistance point and then release it. The turn signal flashes three times.
The function can be deactivated by a qualified workshop.
The turn signals only work with the ignition switched on. The hazard warning lights also work with the ignition switched off ⇒ In an emergency.
If a turn signal on the vehicle or the trailer is faulty, the indicator lamp flashes at twice the normal rate.
The main beam can only be switched on with the ignition and the dipped beam switched on.
Switching lights on and off
Section titled “Switching lights on and off”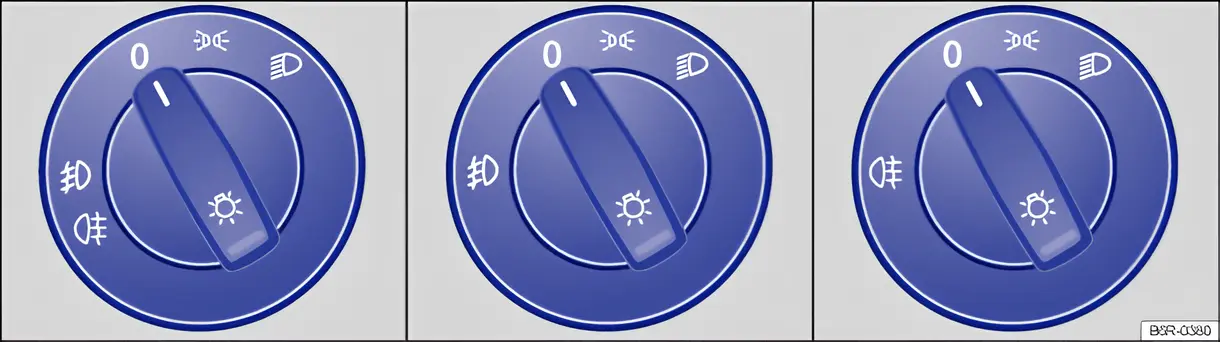
Fig. 69 Next to the steering wheel: some variants of the light switch
First read and observe the introductory information and safety warnings .
Observe the national legal requirements on the use of the vehicle lights.
In vehicles with a factory-fitted towing bracket: when a trailer with a rear fog light is connected electrically, the rear fog light on the vehicle switches off automatically.
Turn the light switch to the required position ⇒ fig. 69 | ||
|---|---|---|
| with the ignition switched off | with the ignition switched on | |
| 0 | Fog lights, dipped beam and side lights switched off. | Lights switched off, or permanent driving lights or daytime running lights (DRL) switched on. |
Side lights switched on. | Side lights switched on. | |
Dipped beam switched off - the side lights may remain on for a while | Dipped beam switched on. | |
Fog lights
Section titled “Fog lights”The indicator lamps and in the light switch or in the instrument cluster also show that the fog lights are switched on.
- Switching on the front fog lights : pull the light switch out of position or as far as the first detent.
- Switching on the rear fog light : pull the light switch out of position or as far as it will go.
- To switch the fog lights off, push the switch in or turn it to position 0.
Signal tones if lights are not switched off
Section titled “Signal tones if lights are not switched off”With the vehicle key removed from the ignition lock and the driver door open, a warning signal sounds under the following conditions, as a reminder to switch the lights off if necessary.
- With the parking light switched on ⇒ Turn signal and main beam lever
- With the light switch in position or .
Gas discharge bulbs
Section titled “Gas discharge bulbs”Gas discharge bulbs produce a bright, even light for better illumination of the road and better visibility of the vehicle to other road users. The light of a gas discharge bulb is produced by a very high voltage between two electrodes in a gas-filled glass bulb.
Over time, the electrodes can wear, which increases the gap between them. The control unit for the gas discharge bulbs detects the change and increases the voltage, so that a bright, even light continues to be produced.
Gas discharge bulbs can also fail. Before a gas discharge bulb fails, it flickers or lights up irregularly. Depending on the equipment, a corresponding message may be displayed in the instrument cluster display.
If the gas discharge bulbs flicker or light up irregularly, visit a qualified workshop immediately and have the headlights checked.
Lights and vision – functions
Section titled “Lights and vision – functions”First read and observe the introductory information and safety warnings .
Parking light
Section titled “Parking light”Depending on the vehicle, when the parking light is switched on (right or left turn signal), the side light in the headlight and the rear light on the corresponding side of the vehicle light up. The parking light is only activated with the ignition switched off and if the turn signal and main beam lever was in the centre position beforehand.
Daytime headlights
Section titled “Daytime headlights”With the permanent driving lights, the dipped beam or the side lights and the number plate light are switched on.
The permanent driving lights come on each time the ignition is switched on, if the light switch is in position 0. In some model versions, the indicator lamp in the light switch shows that the permanent driving lights are switched on.
The permanent driving lights cannot be switched on or off manually.
Daytime running lights
Section titled “Daytime running lights”Separate lamps for the daytime running lights are fitted in the headlights or in the front bumper.
When the daytime running lights are switched on, only these separate lamps are lit ⇒ .
The daytime running lights come on each time the ignition is switched on, if the light switch is in position 0.
Static cornering light
Section titled “Static cornering light”The cornering lights switch on automatically when turning slowly or on tight bends. The cornering lights may be integrated either in the front fog light or in the headlight (bi-xenon version only) and only come on at speeds below 40 km/h (25 mph).
When reverse gear is engaged, the cornering lights on both sides of the vehicle come on, to illuminate the area better while manoeuvring.
Lights with LED technology
Section titled “Lights with LED technology”LEDs cannot be renewed. Seek qualified assistance. Volkswagen recommends using a Volkswagen dealership for this purpose.
In cold or damp weather conditions, the headlights, rear lights and turn signals can mist up temporarily. This is normal and does not affect the service life of the vehicle lighting.
Masking or switching over headlights for driving abroad (travel mode)
Section titled “Masking or switching over headlights for driving abroad (travel mode)”First read and observe the introductory information and safety warnings .
When driving in countries where traffic drives on the opposite side of the road to your own country, the asymmetric dipped beam can dazzle oncoming traffic. Before travelling abroad, the headlights must therefore be masked or adjusted if necessary.
Depending on the vehicle, the headlight setting can be adjusted in the instrument cluster, in the Settings menu, menu item Touring mode ⇒ Settings menu.
In vehicles whose headlights cannot be adjusted via the menu, either mask off certain areas of the headlight lens with film, or have the headlights adjusted by a qualified workshop. Further information is available from qualified workshops. Volkswagen recommends using a Volkswagen dealership for this purpose.
Touring mode or headlight masking film may only be used for a short period. For a permanent conversion, contact a qualified workshop. Volkswagen recommends using a Volkswagen dealership for this purpose.
Headlight range control, instrument and switch lighting
Section titled “Headlight range control, instrument and switch lighting”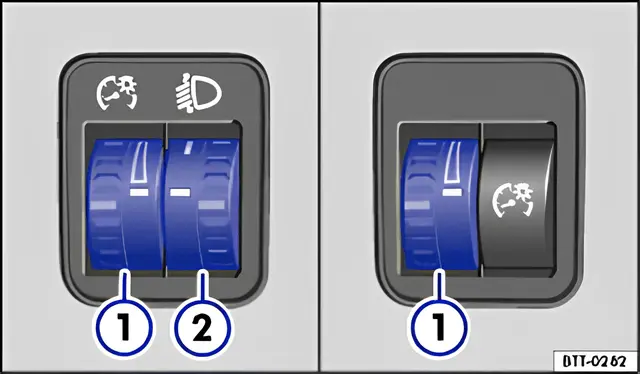
Fig. 70 Next to the steering wheel: rotary knob for the instrument and switch lighting 1 and the headlight range control 2
First read and observe the introductory information and safety warnings .
Instrument and switch lighting
With the lights switched on, the brightness of the instrument and switch lighting can be adjusted steplessly by turning the rotary knob ⇒ fig. 70 1.
Headlight range control
Depending on the value set, the headlight range control 2 adjusts the headlight beam steplessly to suit the load of the vehicle. This gives the driver the best possible visibility without dazzling oncoming traffic ⇒ .
The headlights can only be adjusted with the dipped beam switched on.
| Turn the rotary knob 2 to adjust: | |
|---|---|
Setting | Load conditiona) of the vehicle |
— | Front seats occupied, luggage compartment empty. |
1 | All seats occupied, luggage compartment empty. |
2 | All seats occupied and luggage compartment fully loaded. Towing a trailer with a low nose weight. |
3 | Driver seat only occupied, luggage compartment fully loaded. Towing a trailer with the maximum nose weight. |
Dynamic headlight range control
Section titled “Dynamic headlight range control”The control 2 is not fitted in vehicles with dynamic headlight range control. The headlight range is adjusted automatically to suit the load of the vehicle when the headlights are switched on ⇒ .
Instrument cluster lighting
Section titled “Instrument cluster lighting”With the lights switched on, the brightness of the instrument cluster lighting can be adjusted steplessly by turning the rotary knob 1.
In vehicles with daytime running lights, the instrument cluster lighting switches off in the dark and, for example, when driving through a tunnel. This is intended to prompt the driver to switch on the dipped beam manually, which also switches on the rear lights ⇒ Switching the lights on and off, ⇒ Daytime running lights.
Interior and reading lights
Section titled “Interior and reading lights”First read and observe the introductory information and safety warnings .
| Button or position | Function |
|---|---|
| 0 | Switching the interior lights off. |
Switching the interior lights on. | |
Switching on via the door contact switch (centre position). The interior lighting switches on automatically when the vehicle is unlocked, when a door is opened, or when the vehicle key is removed from the ignition lock. The light goes out a few seconds after all the doors are closed, when the vehicle is locked, or when the ignition is switched on. | |
| Switching the corresponding reading light on or off. |
Luggage compartment light
Section titled “Luggage compartment light”The light switches on and off automatically when the tailgate is opened and closed.
The interior lights and reading lights go out when the vehicle is locked, or after a few minutes if the vehicle key is removed from the ignition lock. This protects the vehicle battery against discharging.