Caring for and cleaning the vehicle exterior
Introduction
Section titled “Introduction”This chapter contains information on the following subjects:
- Washing the vehicle
- Washing the vehicle with a high-pressure cleaner
- Cleaning windows and exterior mirrors
- Cleaning and changing windscreen wiper blades
- Waxing and polishing the vehicle
- Cleaning and caring for chrome and aluminium trim parts
- Cleaning and caring for the deck stripes
- Cleaning wheels
- Care of rubber seals
- De-icing door lock cylinders
- Underseal
- Cleaning the engine compartment
Regular and expert care helps to maintain the value of the vehicle. Proper maintenance may also be one of the requirements for the approval of warranty claims in the event of corrosion or paint defects.
Suitable care products are available from Volkswagen dealers.
Additional information and warnings
Section titled “Additional information and warnings”- Exterior views
- Preparation for working in the engine compartment
- Cleaning and caring for the interior
- Accessories, modifications, repairs and renewal of parts
In the interests of environmental protection, the vehicle should only be washed in specially provided wash bays. This prevents waste water contaminated with oil, grease or fuel from entering the sewerage system. In some countries, washing vehicles anywhere else may be prohibited.
Environmentally-friendly care products should be used.
Leftover car care products should not be disposed of with ordinary household waste. Read the manufacturer’s instructions.
Washing the vehicle
Section titled “Washing the vehicle”First read and observe the introductory information and safety warnings .
The longer substances such as insects, bird droppings, resinous tree sap, road dirt, industrial deposits, tar, soot or road salt and other corrosive materials remain on the vehicle, the more damage they do to the paintwork. High temperatures (for instance in strong sunlight) further intensify the corrosive effect. The underside of the vehicle should also be cleaned thoroughly and regularly.
Car washes
Section titled “Car washes”Please observe the signs on the automatic car wash. Before using an automatic car wash take the usual precautions, such as closing all windows and folding in the exterior mirrors, in order to avoid damage to the vehicle. You must consult the car wash operator if there are special parts on your vehicle such as spoilers, roof luggage carrier systems or radio aerials ⇒ .
The paint is hard-wearing enough for the car to be generally washed in an automatic car wash. However, the effect on the paint depends to a large extent on the design of the car wash. Volkswagen recommends the use of car washes without brushes.
To remove any waxy residue from the windows and to stop wipers rubbing, please note the following ⇒ Cleaning windows and exterior mirrors.
Washing the car by hand
Section titled “Washing the car by hand”When washing by hand, first soften the dirt with plenty of water and rinse off as well as possible.
Then clean the vehicle with a soft sponge, a glove or a brush using only light pressure. Start with the roof and work from the top to the bottom. Use a shampoo for very stubborn dirt only.
The sponge or glove should be wrung out thoroughly at regular intervals.
Clean the wheels, sill panels etc. last. Use a different sponge for this purpose.
Washing the vehicle with a high-pressure cleaner
Section titled “Washing the vehicle with a high-pressure cleaner”First read and observe the introductory information and safety warnings .
Follow the instructions provided by the manufacturer when cleaning your vehicle using a high-pressure cleaner. This applies in particular to the pressure and the spraying distance ⇒ .
Maintain sufficient distance to soft materials such as rubber hoses, insulation, and the ParkPilot sensors. The ParkPilot sensors are located in the rear bumper ⇒ .
Never use concentrated jet nozzles or dirt blasters ⇒ .
Cleaning windows and exterior mirrors
Section titled “Cleaning windows and exterior mirrors”First read and observe the introductory information and safety warnings .
Cleaning windows and exterior mirrors
Section titled “Cleaning windows and exterior mirrors”Moisten the windows and exterior mirrors with commercially available, alcohol-based glass cleaner.
Dry the glass surfaces with a clean chamois leather or a lint-free cloth. Chamois leathers that have been used on painted surfaces are not suitable for use on glass surfaces. They will be soiled with wax deposits which could smear the surfaces.
Use window cleaner or a silicone remover to clean off rubber, oil, grease and silicone deposits ⇒ .
Removing wax
Section titled “Removing wax”Car washes and care products could leave wax deposits on the glass surfaces. Wax residue can only be removed using a special cleaning product or cleaning cloths. Wax deposits on the windscreen can cause the wiper blades to rub. Volkswagen recommends using a glass cleaning cloth - G 052 522 A1 - to remove wax deposits from the windows and exterior mirrors each time the vehicle is washed.
A window cleaner specifically for removing wax will stop the blades rubbing if added to the windscreen wash water. Dilute the cleaner as instructed. Grease removing cleaners will not remove wax deposits ⇒ .
Special cleaners, glass cleaners and glass cleaning cloths are available from Volkswagen dealerships.
Removing snow
Section titled “Removing snow”Use a small brush to remove snow from the windows and exterior mirrors.
Removing ice
Section titled “Removing ice”The best method for removing ice is to use a de-icer spray. If you use an ice scraper, do not move it to and fro, but push it in one direction only. Moving the ice scraper backwards can cause dirt to scratch the window.
Cleaning and changing windscreen wiper blades
Section titled “Cleaning and changing windscreen wiper blades”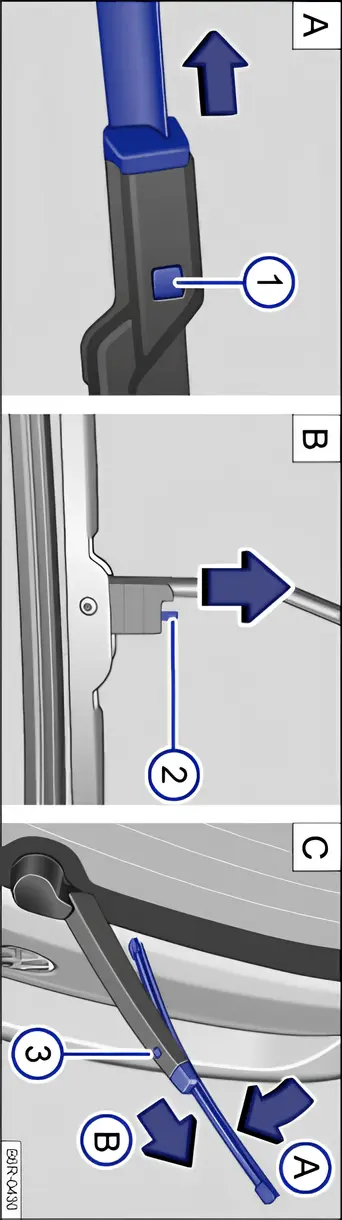
Fig. 144 Variants A and B: changing the windscreen wiper blades. Variants B and C: changing the rear window wiper blade
First read and observe the introductory information and safety warnings .
The factory-fitted windscreen/window wiper blades are coated with graphite. The graphite coating ensures that the windscreen wiper blade moves quietly over the windscreen. If the graphite coating is damaged, the windscreen wiper will become louder.
Check the condition of the wiper blades on a regular basis. Rubbing wiper blades should be changed if damaged or cleaned if dirty ⇒ .
Damaged wiper blades should be replaced immediately. Windscreen wiper blades can be bought from a qualified workshop.
Cleaning windscreen wiper blades
Section titled “Cleaning windscreen wiper blades”Note for the front windscreen wiper: move the wiper arms to the service position before lifting them ⇒ Service position for the front windscreen wipers.
- When lifting a wiper arm hold it only by the wiper blade mounting.
- Clean the windscreen wiper blade carefully using a damp cloth ⇒ .
- Place the windscreen wiper arm back onto the windscreen.
Changing the windscreen wiper blades (Variant A)
Section titled “Changing the windscreen wiper blades (Variant A)”- Move the wiper arms to the service position before lifting ⇒ Service position for the front windscreen wipers.
- When lifting a wiper arm hold it only by the wiper blade mounting.
- Press and hold the release button ⇒ fig. 144 1 and simultaneously pull off the wiper blade in the direction of the arrow.
- Insert a new wiper blade with the same length and design onto the wiper arm. Push it on until it engages.
- Place the windscreen wiper arm back onto the windscreen.
Changing the windscreen or rear-window wiper blades (Variant B)
Section titled “Changing the windscreen or rear-window wiper blades (Variant B)”- Note for the front windscreen wiper: move the wiper arms to the service position before lifting them ⇒ Service position for the front windscreen wipers.
- When lifting a wiper arm hold it only by the wiper blade mounting.
- Press and hold the release button 2 and push off the wiper blade in the direction of the arrow at the same time. Then unhook the wiper blade and take it off in the opposite direction to the arrow.
- Push a new wiper blade of the same length and design slightly in the direction of the arrow and hook it onto the wiper arm again. Next, pull the windscreen wiper arm in the opposite direction to the arrow until it engages.
- Carefully push the windscreen wiper arm back onto the windscreen or rear window.
Changing the rear-window wiper blade (Variant C)
Section titled “Changing the rear-window wiper blade (Variant C)”- When lifting a wiper arm hold it only by the wiper blade mounting.
- Press and hold down the release button 3 and then pull the wiper blade upwards in the direction of the arrow A and pull it off in the direction of the arrow B. You may need to use some force to do this.
- Insert a new wiper blade with the same length and design on to the wiper arm against the direction of the arrow. Push it on until it engages B. The windscreen wiper blade must be in a tilted position A to do this.
- Place the wiper arm back onto the rear window.
Waxing and polishing the vehicle
Section titled “Waxing and polishing the vehicle”First read and observe the introductory information and safety warnings .
Waxing
Section titled “Waxing”Waxing protects the paintwork. You will need to re-wax the vehicle with a good hard wax if water no longer clearly forms small drops and runs off the paintwork when it is clean.
Even if a wax solution is used regularly in the car wash, Volkswagen recommends protecting the paint with a coat of hard wax at least twice a year.
Polishing
Section titled “Polishing”Polishing is only necessary if the paint has lost its shine, and the gloss cannot be brought back by applying wax.
The car must be waxed after polishing if the polish used does not contain wax compounds to seal the paint.
Cleaning and caring for chrome and aluminium trim parts
Section titled “Cleaning and caring for chrome and aluminium trim parts”First read and observe the introductory information and safety warnings .
- Use a damp, clean, lint-free and soft cloth to clean the surfaces.
- For heavy soiling use a special solvent-free cleaning product.
- Polish the chrome and aluminium trim parts using a soft, dry cloth.
Cleaning and caring for the deck stripes
Section titled “Cleaning and caring for the deck stripes”First read and observe the introductory information and safety warnings .
Deck stripes are a design feature and are made up of soft polyvinyl chloride (PVC).
In the areas of the vehicle where there are deck stripes, the underlying paint layer is protected from weather and environmental conditions.
If the deck stripes remain on the vehicle for a long time, the appearances of paint on the area protected by the deck stripes and the area not covered by the stripes may begin to show differences. This can usually be rectified by polishing.
Volkswagen recommends that you seek advice from a Volkswagen Partner or workshop as to a suitable care product.
Durability of the deck stripes
Section titled “Durability of the deck stripes”Environmental conditions such as sunlight, moisture, pollution, stone impact, etc. affect the durability and colour of the deck stripes. Signs of wear and use are normal and do not indicate a defect in quality.
After the deck stripes are fitted bubble formation may appear due to strong summer heat for example. These bubbles will usually reduce without intervention. This will not limit use of the vehicle in any way.
In warm or moderate climates slight bubble formation may appear after a period of two to three years. In warm or hot climates the deck stripes can show signs of wear and slight bubble formation may appear after just one year.
In very hot climates, damage in the form of bubbles may appear within one year, especially due to strong heat from direct sunlight.
Cleaning the deck stripes
Section titled “Cleaning the deck stripes”A vehicle with deck stripes is suitable for automatic car washes provided you do not select a programme with hot wax.
Please pay attention to the information and notes on washing the vehicle and on washing using a high-pressure cleaner.
When using presprays and vapour jets always maintain a distance of at least 20 cm between the spray nozzle and the deck stripes ⇒ .
Insect residue, bird droppings, road dirt, industrial deposits, tar, soot, road salt and other aggressive deposits can cause damage to the deck stripes.
The longer the aggressive deposits remain on the deck stripes, the worse the negative impact will be. High temperatures (for instance in strong sunlight) further intensify the corrosive effect. Immediately wash the vehicle thoroughly using warm water and a soap solution ⇒ .
Remove stubborn impurities with caution using white spirits and then rinse using warm water. Do not use any aggressive substances such as petrol, thinner or solvents.
Care of the deck stripes
Section titled “Care of the deck stripes”Basically, the same care instructions for vehicle paint apply.
Treat the deck stripes regularly, every 3 months (no longer) with liquid hot wax. Hot wax smoothes the surface and has a dirt-repellent effect.
Only use soft microfibre cloths to apply it.
Volkswagen recommends that you seek advice from a Volkswagen Partner or workshop as to a suitable care product.
If the surface of the deck stripes is damaged, e.g. by the impact of gravel, the damage can only be rectified by replacing the whole deck stripe element. Volkswagen recommends having the work carried out by a qualified workshop.
Cleaning wheels
Section titled “Cleaning wheels”First read and observe the introductory information and safety warnings .
Cleaning steel wheels
Section titled “Cleaning steel wheels”An industrial cleaner is needed to remove accumulated brake dust. Steel wheels should therefore be cleaned regularly with a separate sponge.
Any damage to the paint on steel wheels should be touched up before the metal starts to rust.
Caring for and cleaning alloy wheels
Section titled “Caring for and cleaning alloy wheels”Wash grit and brake dust from alloy wheels approximately every 2 weeks. Then use an acid-free detergent to clean the wheels. Volkswagen recommends applying a hard wax compound to the wheels approximately every 3 months.
It is important to remove road salt and brake dust by washing the wheels at regular intervals, to deter corrosion to the alloy.
Always use an acid-free detergent for alloy wheels. Car polish or other abrasive agents should not be used on the wheels.
If the protective coating is damaged, e.g. by stone impact, the damaged area should be repaired immediately.
Care of rubber seals
Section titled “Care of rubber seals”First read and observe the introductory information and safety warnings .
The rubber seals on the doors, windows etc. will seal better, remain flexible and last longer if they are treated at regular intervals with a suitable care product.
Use a soft cloth to remove dust and dirt from the rubber seals.
De-icing door lock cylinders
Section titled “De-icing door lock cylinders”First read and observe the introductory information and safety warnings .
Volkswagen recommends the use of genuine Volkswagen spray with lubricating and anti-corrosive properties to de-ice the lock cylinders.
Underseal
Section titled “Underseal”First read and observe the introductory information and safety warnings .
The underside of the vehicle is coated to protect it from corrosion and damage. The protective coating on the underside of the vehicle could be damaged when driving. Volkswagen therefore recommends that the protective coating on the underside of the vehicle and on the running gear should be checked regularly and repaired if necessary.
Cleaning the engine compartment
Section titled “Cleaning the engine compartment”First read and observe the introductory information and safety warnings .
The engine compartment of any motor vehicle is a hazardous area ⇒ Preparation for working in the engine compartment.
The engine compartment should be cleaned by a qualified workshop. Corrosion protection could be removed and electrical components damaged if the compartment is cleaned incorrectly. Furthermore, water could enter the vehicle interior directly via the plenum chamber ⇒ .
If the engine compartment is very dirty, we recommend that you always go to a qualified workshop to have it cleaned by a professional mechanic. Volkswagen recommends using a Volkswagen dealership for this purpose.
Plenum chamber
Section titled “Plenum chamber”The plenum chamber is located in the engine compartment between the windscreen and the engine and has a perforated cover. Air from outside is drawn in from the plenum chamber and is passed into the vehicle interior via the heating and fresh air system and the air conditioning system.
Leaves and other loose objects must be removed from the cover of the plenum chamber at regular intervals using a vacuum cleaner or by hand.
In the interests of environmental protection, the engine compartment should be washed only in specially provided wash bays. This prevents toxic waste water containing oil, grease and fuel from entering the sewerage system. In some districts, washing the engine compartment anywhere else may be prohibited.