Breakdown set
Introduction
Section titled “Introduction”This chapter contains information on the following subjects:
- Contents of the breakdown set
- Preparation
- Sealing and inflating tyres
- Test after driving for 10 minutes
You can use the breakdown set (tyre mobility set) to safely seal any tyre damage caused by foreign bodies or punctures (up to 4 mm in diameter).
Do not remove foreign objects (e.g. screws or nails) from the tyre!
Once the sealant has been added to the tyre, the tyre pressure must be checked again after approximately 10 minutes of driving.
Seek expert assistance if more than one vehicle tyre is damaged. The breakdown set is only designed for filling one tyre.
Only use the breakdown set if the car is parked in a safe place, you are familiar with the required actions and safety procedures, and you have access to the correct breakdown set. Seek expert assistance if this is not the case.
The tyre sealant must not be used
Section titled “The tyre sealant must not be used”- If the rim is damaged.
- If the outside temperature is below -20 °C (-4 °F).
- If there are cuts or punctures in the tyre that are larger than 4 mm.
- If the tyre pressure is very low or the tyres are flat.
- If the use-by date on the tyre filler bottle has expired.
Additional information and warnings
Section titled “Additional information and warnings”Dispose of used or out-of-date sealant in accordance with legal requirements.
You can get a new tyre filler bottle from a Volkswagen dealership.
Observe the separate instructions from the manufacturer of the breakdown set.
Contents of the breakdown set
Section titled “Contents of the breakdown set”First read and observe the introductory information and safety warnings .
The breakdown set is located underneath the floor covering in the luggage compartment. It includes the following components ⇒ fig. 173.
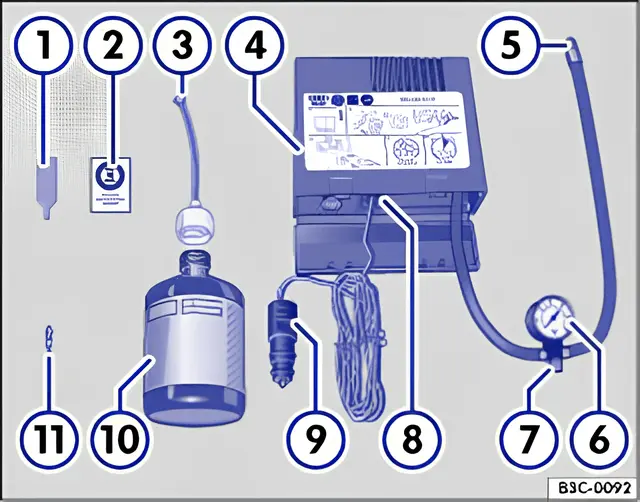
Fig. 173 The breakdown set
- Valve core extractor
- Sticker with the maximum permitted speed “max. 80 km/h” or “max. 50 mph”
- Filler hose with plug
- Air compressor
- Tyre filler hose
- Tyre pressure display 1)
- Air bleed screw 2)
- On/off switch
- 12-volt plug
- Tyre filler bottle with sealant 1)
- Spare valve core
2) This function may be carried out by a button in the compressor instead.
There is a slot on the lower end of the valve core extractor 1 for the valve insert. This is required for extracting and fitting the tyre valve. This also applies to the spare valve core 11.
Preparation
Section titled “Preparation”First read and observe the introductory information and safety warnings .
Checklist
Section titled “Checklist”The following actions must always be carried out in the given order in preparation for filling a tyre ⇒ :
- If you get a flat tyre, park your vehicle on a firm and level surface at a safe distance from the flow of traffic.
- Apply the handbrake firmly.
- Automatic gearbox: move the selector lever to position P.
- Stop the engine and remove the key from the ignition.
- Manual gearbox: select a gear.
- Ensure that all vehicle occupants exit the vehicle and go straight to a safe place, e.g. behind the safety barrier.
- Switch on the hazard warning lights and position the warning triangle. Observe any legal requirements.
- Check whether the puncture can be repaired with the breakdown set.
- When towing a trailer, unhitch the trailer from the vehicle and park it properly.
- Remove any items of luggage from the luggage compartment.
- Take the breakdown set out of the luggage compartment.
- Take the sticker ⇒ fig. 173 2 from the breakdown set and stick it on the dash panel within the driver’s field of vision.
- Do not remove foreign objects (e.g. screws or nails) from the tyre.
Sealing and inflating tyres
Section titled “Sealing and inflating tyres”First read and observe the introductory information and safety warnings .
Sealing a tyre
Section titled “Sealing a tyre”- Unscrew the cap from the tyre valve.
- Use the valve core extractor ⇒ fig. 173 1 to screw the valve core out of the tyre valve. Place the core on a clean surface.
- Shake the tyre filler bottle ⇒ fig. 173 10 vigorously up and down several times.
- Screw the filler hose ⇒ fig. 173 3 tightly onto the tyre filler bottle in a clockwise direction. The plastic foil on the plug is pierced automatically.
- Remove the plug from the filler hose ⇒ fig. 173 3 and place the open end fully on the tyre valve.
- Hold the bottle upside down and inject the entire contents of the tyre filler bottle into the tyre.
- Remove the empty tyre filler bottle from the valve.
- Use the valve core extractor ⇒ fig. 173 1 to screw the valve core back onto the tyre valve.
Inflating the tyre
Section titled “Inflating the tyre”- Screw the tyre filler hose ⇒ fig. 173 5 of the air compressor tightly onto the tyre valve.
- Check that the bleed screw ⇒ fig. 173 7 is closed.
- Start the engine and let it run.
- Insert the plug ⇒ fig. 173 9 into the 12-volt socket in the vehicle.
- Use the on/off switch ⇒ fig. 173 8 to switch on the air compressor.
- Run the compressor until the tyre pressure has reached 2.0 ‑ 2.5 bar (29 ‑ 36 psi / 200 ‑ 250 kPA) ⇒ . The maximum running time is 8 minutes ⇒ .
- Switch off the air compressor.
- If a pressure level of 2.0 ‑ 2.5 bar (29 ‑ 36 psi / 200 ‑ 250 kPA) cannot be achieved, unscrew the tyre filler hose from the tyre valve.
- Drive (or reverse) the vehicle approximately 10 metres so that the sealing compound is more evenly distributed in the tyre.
- Screw the tyre filler hose for the air compressor firmly back onto the tyre valve and inflate the tyre again.
- If the required pressure still cannot be reached, the tyre is too badly damaged. The tyre cannot be sealed with the breakdown set. Do not drive on. Seek expert assistance ⇒ .
- Disconnect the air compressor and unscrew the tyre filler hose from the tyre valve.
- Drive the vehicle no faster than 80 km/h (50 mph) once a tyre pressure of 2.0 ‑ 2.5 bar (29 ‑ 36 psi / 200 ‑ 250 kPA) has been reached.
- Check the tyre pressure after driving for 10 minutes ⇒ Test after driving for 10 minutes.
Test after driving for 10 minutes
Section titled “Test after driving for 10 minutes”First read and observe the introductory information and safety warnings .
Reconnect the tyre filler hose ⇒ fig. 173 5 and check the tyre pressure on the tyre pressure display 6.
1.3 bar (19 psi / 130 kPA) and lower:
Section titled “1.3 bar (19 psi / 130 kPA) and lower:”- Do not drive on! The tyre cannot be sealed adequately with the breakdown set.
- Seek expert assistance ⇒ .
1.4 bar (20 psi / 140 kPA) and higher:
Section titled “1.4 bar (20 psi / 140 kPA) and higher:”- Set the tyre pressure back to the correct value.
- Resume your journey to the nearest qualified workshop. Do not exceed a maximum speed of 80 km/h (50 mph).
- Have the damaged tyre replaced at the workshop.