Fuses
Introduction
Section titled “Introduction”This chapter contains information on the following subjects:
At the time of print we are unable to provide an up-to-date overview of the locations of the fuses for the electrical consumers. This is because the vehicle is under constant development, because fuses are assigned differently depending on the vehicle equipment level and because several consumers may use a single fuse. You can get more information about the fuse layout from a Volkswagen dealership.
Several electrical consumers could share a single fuse. Conversely, a single consumer could have more than one fuse.
Therefore fuses should only be replaced when the cause of the fault has been rectified. If a new fuse blows shortly after insertion, have the electrical system checked by a qualified workshop as soon as possible.
Additional information and warnings
Section titled “Additional information and warnings”Fuses in the vehicle
Section titled “Fuses in the vehicle”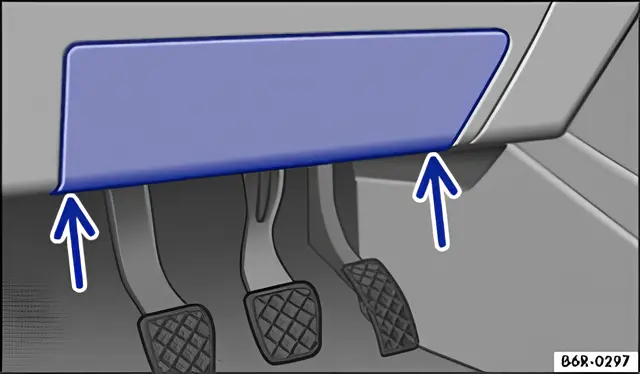
Fig. 174 Dash panel on the driver side: fuse box cover
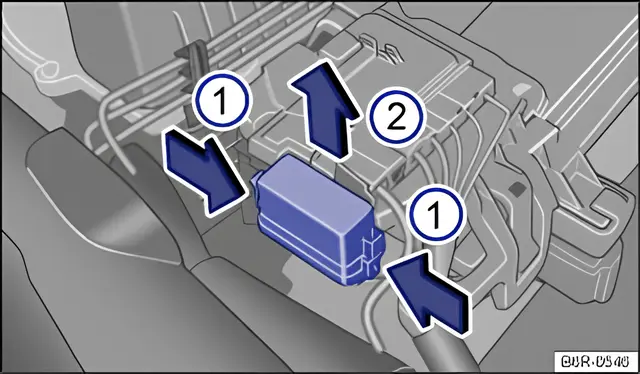
Fig. 175 In the front left of the engine compartment: fuse box cover
First read and observe the introductory information and safety warnings .
Fuses must always be replaced by a new fuse with the same amp rating (same colour and markings) and size.
Colour coding of fuses
Section titled “Colour coding of fuses”| Colour | Amp rating |
|---|---|
| Purple | 3 |
| Light brown | 5 |
| Brown | 7.5 |
| Red | 10 |
| Blue | 15 |
| Yellow | 20 |
| White or clear | 25 |
| Green | 30 |
| Orange | 40 |
Opening the fuse box in the dash panel
Section titled “Opening the fuse box in the dash panel”- Insert a flat object (e.g. the screwdriver from the vehicle toolkit) into the recesses ⇒ fig. 174 (arrows) and carefully prise off the cover.
Opening the fuse box in the engine compartment
Section titled “Opening the fuse box in the engine compartment”- Open the bonnet .
- Press the release buttons together in the direction of the arrows ⇒ fig. 175 1 to release the fuse box cover.
- Remove the cover upwards in the direction of arrow 2.
- To fit, place the cover over the fuse box. Press the release buttons down in the opposite direction to the arrows 2 until they engage audibly.
This chapter does not refer to all the fuses located in the vehicle. These should be changed only by a qualified workshop.
Changing a blown fuse
Section titled “Changing a blown fuse”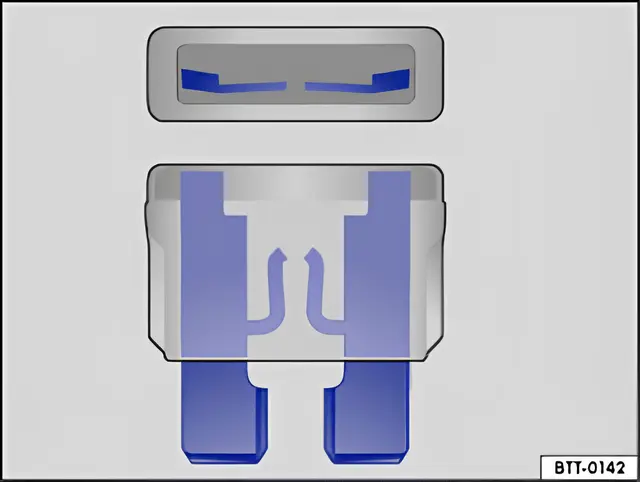
Fig. 176 A blown fuse
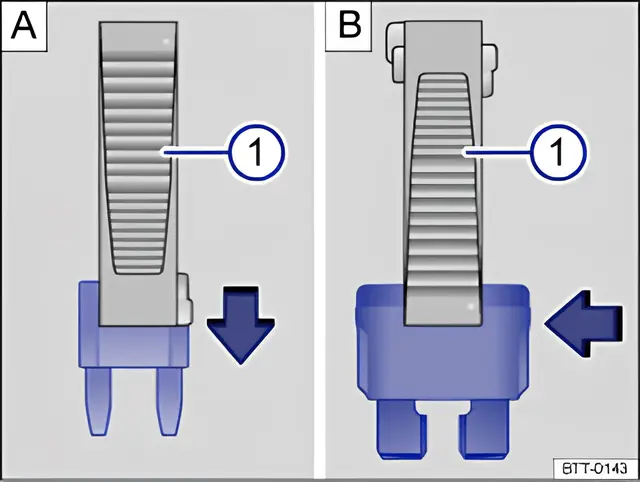
Fig. 177 Removing or fitting a fuse using the plastic pliers 1
First read and observe the introductory information and safety warnings .
Preparation
Section titled “Preparation”- Switch off the ignition, the lights and all electrical consumers.
- Open the appropriate fuse box.
Detecting a blown fuse
Section titled “Detecting a blown fuse”If the metal strip is melted this indicates that the fuse has blown ⇒ fig. 176.
Shine a torch onto the fuse. This will help you to spot the blown fuse more easily.
Changing a fuse
Section titled “Changing a fuse”- If applicable, take the plastic pliers ⇒ fig. 177 1 out of the fuse box cover.
- For small fuses, push the catch on 1 from above A.
- For bigger fuses, push the catch 1 onto the fuse from the side B.
- Remove the fuse.
- If the fuse has blown, replace it with a new fuse of the same amp rating (same colour and same markings) and same size ⇒ .
- If necessary, re-insert the plastic pliers into the cover.
- Replace the cover.
More about the fuses and relays in the Polo 6R on my blog: Fuses and relays in the Polo 6R.