Wipers and washers
Introduction
Section titled “Introduction”This chapter contains information on the following subjects:
- Warning lamp
- Wiper lever
- Windscreen wiper functions
- Service position for the windscreen wipers
- Rain and light sensor
- Checking and topping up the washer fluid
Additional information
Section titled “Additional information”- Exterior views
- Air recirculation mode
- Preparing to work in the engine compartment
- Cleaning and caring for the vehicle exterior
Indicator lamp
Section titled “Indicator lamp”First read and observe the introductory information and safety warnings .
Lights up | Possible cause | Solution |
|---|---|---|
Washer fluid level too low | Top up the washer fluid reservoir at the earliest opportunity ⇒ Checking and topping up the washer fluid. |
Some warning and indicator lamps light up for a function check when the ignition is switched on. They go out after a few seconds.
Windscreen wiper lever
Section titled “Windscreen wiper lever”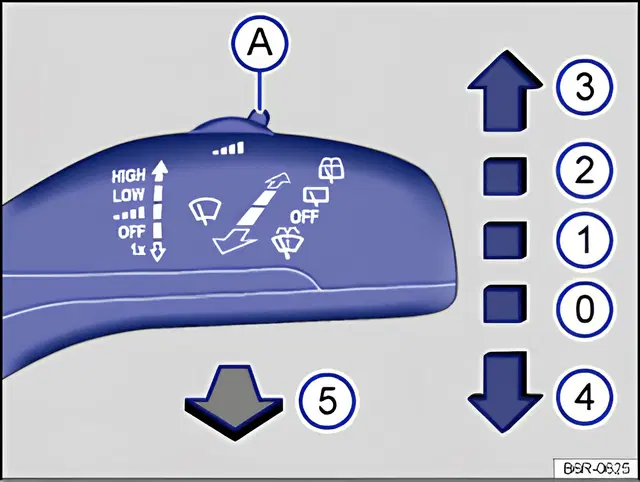
Fig. 73 Operating the windscreen wipers
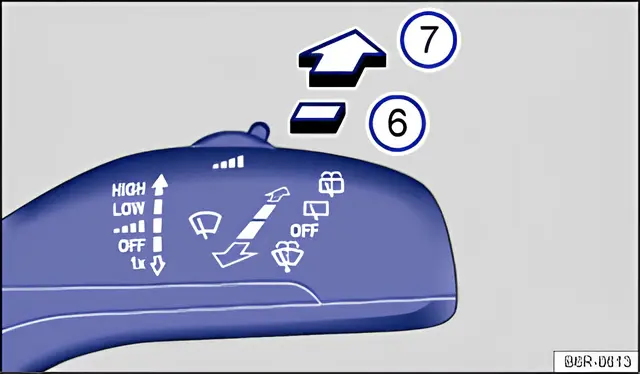
Fig. 74 Operating the rear window wiper
First read and observe the introductory information and safety warnings .
Move the wiper lever to the required position ⇒ | ||
|---|---|---|
| 0 | OFF | Windscreen wiper switched off. |
| 1 | Intermittent wiping of the windscreen. The switch ⇒ fig. 73 A is used to set the wiping intervals (vehicles without a rain sensor) or the sensitivity of the rain sensor. | |
| 2 | LOW | Slow wiping. |
| 3 | HIGH | Fast wiping. |
| 4 | 1x | Tap the wiper lever for a single wipe. Press the wiper lever down and hold it to make the wipers wipe faster. |
| 5 | Automatic wash and wipe to clean the windscreen while the wiper lever is pulled towards the steering wheel. | |
| 6 | Intermittent wiping of the rear window. The wiper operates approximately every 6 seconds. | |
| 7 | Automatic wash and wipe to clean the rear window while the wiper lever is pressed. | |
The wipers only operate when the ignition is switched on and the bonnet or the tailgate is closed.
The rear window wiper switches on automatically when the windscreen wipers are switched on and reverse gear is engaged.
Windscreen wiper functions
Section titled “Windscreen wiper functions”First read and observe the introductory information and safety warnings .
How the wipers respond in different situations: | |
|---|---|
When the vehicle comes to a stop: | The selected wiper setting temporarily switches down to the next setting. |
During automatic wash and wipe: | The Climatronic switches to air recirculation mode for approximately 30 seconds, to prevent the smell of the washer fluid from entering the vehicle interior. |
During intermittent wiping: | The wiping intervals are controlled according to the road speed. The higher the road speed, the shorter the interval. |
Heated washer jets
Section titled “Heated washer jets”The heating thaws frozen washer jets, but does not heat the supply hoses. The heated washer jets regulate their heating output automatically when the ignition is switched on, depending on the ambient temperature ⇒ Automatically heated washer jets.
Headlight washer system
Section titled “Headlight washer system”The headlight washer system cleans the headlight lenses ⇒ Headlight washers
With the ignition and the dipped beam switched on, the headlights are also washed the first time the washer system is operated and then every fifth time. To do this, pull the wiper lever towards the steering wheel with the dipped beam or main beam switched on. Remove dried-on dirt, such as insect remains, from the headlight lenses at regular intervals, for example after refuelling.
To ensure that the headlight washer system also works in winter, clear snow from the washer jet housings before use. Remove ice with a de-icer spray if necessary.
If there is an obstruction on the window, the wiper attempts to push it aside. If the obstruction continues to block the wiper, the wiper stops. Remove the obstruction and switch the wipers on again.
Service position for the front windscreen wipers
Section titled “Service position for the front windscreen wipers”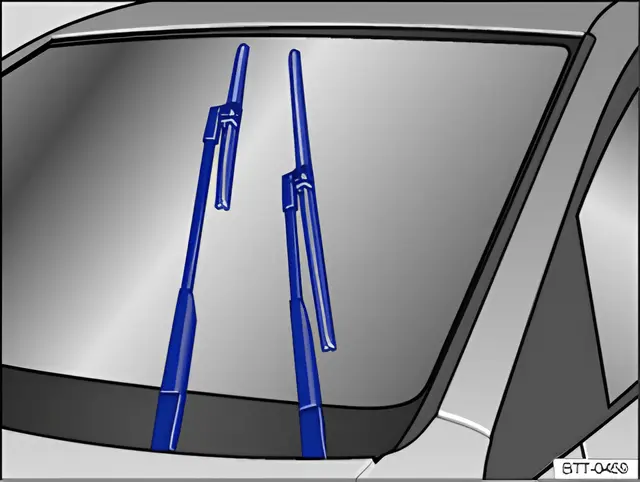
Fig. 75 Windscreen wiper in the service position
First read and observe the introductory information and safety warnings .
In the service position, the wiper arms can be lifted away from the windscreen ⇒ fig. 75. To move the wipers into the service position:
- The bonnet must be closed ⇒ Opening and closing the bonnet.
- Switch the ignition on and off again.
- Briefly press the wiper lever down ⇒ fig. 75 4.
Fold the wiper arms back onto the windscreen before setting off. Briefly press the wiper lever down to return the wiper arms to their starting position.
Lifting the windscreen wiper blades
Section titled “Lifting the windscreen wiper blades”- Move the wiper arms into the service position before lifting them ⇒ .
- Only take hold of the wiper arm at the point where the blade is attached when lifting it.
Rain/light sensor
Section titled “Rain/light sensor”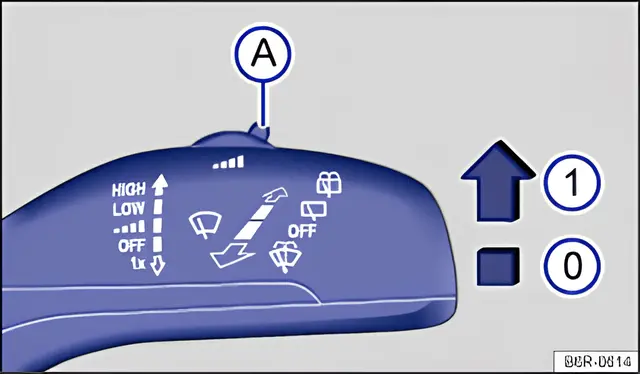
Fig. 76 Wiper lever: adjusting the rain and light sensor A
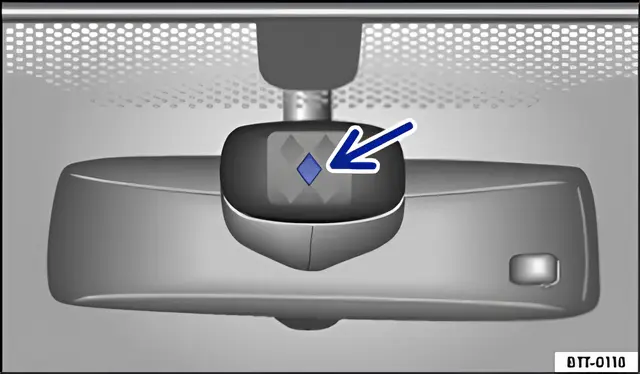
Fig. 77 Active area of the rain and light sensor
When activated, the rain and light sensor (RLS) controls the wiping interval automatically, depending on the intensity of the rainfall ⇒ . The sensitivity of the rain and light sensor can be adjusted manually. For manual wiping ⇒ Wiper lever.
Press the lever into the required position ⇒ fig. 76: | |
|---|---|
| 0 | Rain and light sensor switched off. |
| 1 | Rain and light sensor active - automatic wiping as required. |
| A | Adjusting the sensitivity of the rain and light sensor:
|
Changes in the activation of the rain/light sensor
Section titled “Changes in the activation of the rain/light sensor”Possible causes of malfunctions and misinterpretation in the active area ⇒ fig. 76 of the rain and light sensor include:
- Damaged wiper blades: a film of water or streaks caused by damaged wiper blades can delay switch-on, considerably shorten the wiping intervals or affect the speed of continuous wiping.
- Insects: insects striking the windscreen can cause the wipers to operate.
- Salt streaks: in winter, salt streaks on the windscreen can cause unusually long wiping on an almost dry windscreen.
- Dirt: dry dust, wax, coatings on the windscreen (lotus effect) and residues from cleaning agents (automatic car wash) can make the rain and light sensor respond slowly, or not at all.
- Damage to the windscreen: a stone chip with the rain and light sensor switched on triggers a wiping cycle. The rain and light sensor then detects the reduced sensor area and adapts to it. Depending on the size of the stone chip, the switch-on response of the sensor may change.
Clean the active area of the rain and light sensor ⇒ fig. 77 (arrow) regularly and check the wiper blades for damage.
An alcohol-based glass cleaner is recommended for removing wax and polish residues.
Checking and refilling the windscreen washer fluid level
Section titled “Checking and refilling the windscreen washer fluid level”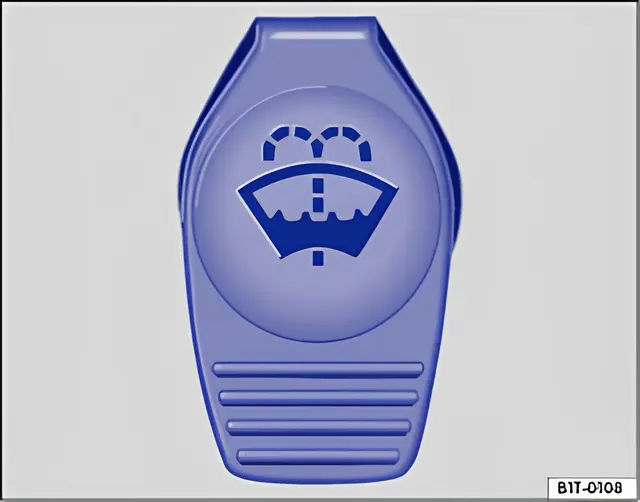
Fig. 78 In the engine compartment: cap of the washer fluid reservoir
First read and observe the introductory information and safety warnings .
Check the washer fluid level regularly and top it up if necessary.
There is a filter in the filler neck of the washer fluid reservoir. The filter catches larger dirt particles during filling and protects the washer jets. Only remove the filter for cleaning. If the filter is damaged or missing, dirt particles can enter the system during filling and block the washer jets.
- Open the bonnet ⇒ Opening and closing the bonnet.
- The washer fluid reservoir can be identified by the symbol on its cap ⇒ fig. 78.
- Check whether there is still enough washer fluid in the reservoir.
- To top up, add a screen wash additive recommended by Volkswagen to clean water ⇒ . Observe the mixing ratios given on the packaging.
- At low outside temperatures, add a suitable antifreeze so that the water cannot freeze ⇒ .
Recommended windscreen washer fluid
Section titled “Recommended windscreen washer fluid”- In the warmer months, summer screen wash G 052 184 A2. Mixing ratio 1:100 (1 part concentrate to 100 parts water) in the washer fluid reservoir.
- All-year screen wash G 052 164 M2. Mixing ratio in winter down to -18°C (0°F) approximately 1:2 (1 part concentrate to 2 parts water), otherwise 1:4 in the washer fluid reservoir.
Capacities
Section titled “Capacities”The capacity of the washer fluid reservoir is approximately 3.5 - 5.4 l (VW Polo versions with factory-fitted headlight washers have a larger reservoir).