Changing a bulb
Introduction
Section titled “Introduction”This chapter contains information on the following subjects:
- Indicator lamp
- Information on changing bulbs
- Removing and installing the headlights
- Changing bulbs in the front headlights (halogen H4)
- Changing bulbs in the front headlights (halogen H7)
- Changing bulbs in the front headlights (Xenon)
- Changing bulbs in the front bumper
- Changing the bulbs in the tail light cluster
- Changing the bulb in the number plate light
- Changing bulbs in the side turn signals
Changing the vehicle bulbs requires considerable technical skill. If you do not feel confident with the procedure, Volkswagen recommends that you have the bulbs changed by a Volkswagen dealership, or that you seek other expert assistance. You must contact a qualified workshop if other vehicle parts around the lights need to be removed, or if gas discharge bulbs need to be replaced.
You should keep a box with spare light bulbs for the lights that ensure the vehicle is roadworthy in the vehicle at all times. Spare bulbs are available from Volkswagen dealerships. In some countries it is a legal requirement to have these spare bulbs in the vehicle.
It may be illegal to drive with a defective bulb in the exterior lighting.
Additional bulb specifications
Section titled “Additional bulb specifications”Some bulbs in headlights or in tail light clusters might have factory specifications that are different to standard bulbs. The designation is inscribed on the bulb, either on the glass part or on the base.
Lights with LED technology
Section titled “Lights with LED technology”The LEDs cannot be replaced. Seek expert assistance. Volkswagen recommends using a Volkswagen dealership for this purpose.
Additional information and warnings
Section titled “Additional information and warnings”- Exterior views
- Lights and vision
- Preparation for working in the engine compartment
- Vehicle toolkit
- Fuses
Indicator lamp
Section titled “Indicator lamp”First read and observe the introductory information and safety warnings .
Lit up | Possible cause | Solution |
|---|---|---|
| There is a defective bulb in the vehicle’s exterior lighting. | Change the defective bulb. |
Several warning and indicator lamps will light up briefly as a functional check when the ignition is switched on. They will switch off after a few seconds.
Monitoring of the light bulbs on the trailer
Section titled “Monitoring of the light bulbs on the trailer”For vehicles with a factory-fitted towing bracket, the vehicle will also monitor certain bulbs on a trailer which has been connected properly via the trailer socket:
If a turn signal in the trailer fails, the indicator lamp ( or ) in the instrument cluster will flash twice as fast ⇒ Indicator lamps in the instrument cluster.
- Failure of all turn signals on one side.
- Failure of the tail light on one side; in some models, failure of the licence plate light.
- Failure of both brake lights.
Information on changing bulbs
Section titled “Information on changing bulbs”First read and observe the introductory information and safety warnings .
Checklist
Section titled “Checklist”Always carry out the following actions for changing a bulb in the given order ⇒ :
- Park the vehicle on a firm and level surface at a safe distance from the flow of traffic.
- Apply the handbrake firmly.
- Turn the light switch to position 0 ⇒ Switching lights on and off.
- Shift the turn signal lever to neutral.
- Automatic gearbox: move the selector lever to position P.
- Stop the engine and remove the vehicle key from the ignition lock.
- Manual gearbox: select a gear.
- Switch off the orientation lighting.
- Leave the defective bulbs to cool down.
- Check to see if a fuse has blown ⇒ Fuses.
- Follow the instructions to change the affected bulb ⇒ . Always use identical bulbs with the same designation, the same wattage and the same shape. The designation is inscribed on the bulb, either on the glass part or on the base.
- Do not touch the glass part of the bulb with unprotected fingers. The heat of the bulb would cause the fingerprint to evaporate and condense on the reflector. This will impair the brightness of the headlight.
- After changing the bulb, check to make sure that the bulb is working properly. If the bulb is not working properly, the bulb may not have been inserted properly or may have failed again, or the connector may have been inserted incorrectly.
- Any time you change a bulb in the front of the vehicle, the headlight settings should be checked by a qualified workshop.
Removing and installing the headlights
Section titled “Removing and installing the headlights”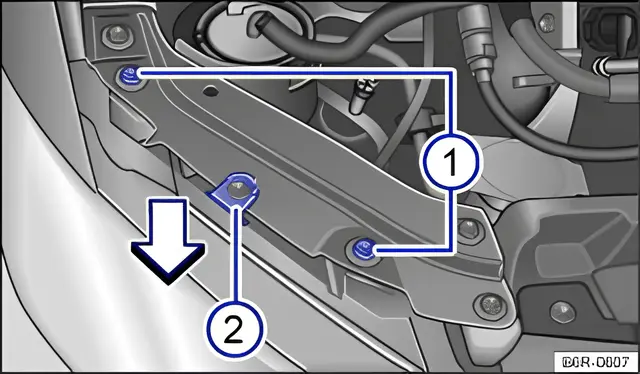
Fig. 178 In the engine compartment: securing bolts for the right headlight
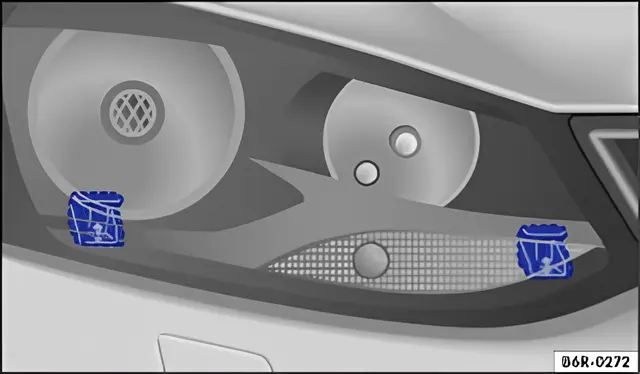
Fig. 179 Guides for installing the right headlight.
First read and observe the introductory information and safety warnings .
Depending on the vehicle variant, the headlight may have to be removed in order to replace the bulb.
You will need the screwdriver with the torx blade from the vehicle toolkit to remove the headlights.
Removing the headlight
Section titled “Removing the headlight”- Switch off the lights and ignition
- Open the bonnet ⇒ .
- Use the torx key to remove the screws ⇒ fig. 178 1.
- Press the bottom of the headlight forwards, out of the guides in the direction of the arrow ⇒ fig. 178.
- Disconnect the connection on the headlight by pressing the connector towards the headlight housing and simultaneously pressing the lug on the connector to disengage. Then remove the connector from the headlight.
- Pull the headlight forwards and all the way out of the vehicle ⇒ .
Installing the headlight
Section titled “Installing the headlight”- Push the headlight into the vehicle until it reaches the upper stop in the middle 2. Make sure that the headlight fits properly into the lower guides ⇒ fig. 179 ⇒ .
- Insert the connector into the connection point on the headlight housing. You should feel it click into place.
- Screw the screws ⇒ fig. 178 1 into the headlight housing.
- Push the headlight against the upper middle position 2 and tighten the screws 1 with the torx key.
- Close the bonnet and check that the headlight is positioned properly.
The illustrations show the right-hand headlight. The left-hand headlight is a mirror image of the one shown.
Changing bulbs in the front headlights (halogen H4)
Section titled “Changing bulbs in the front headlights (halogen H4)”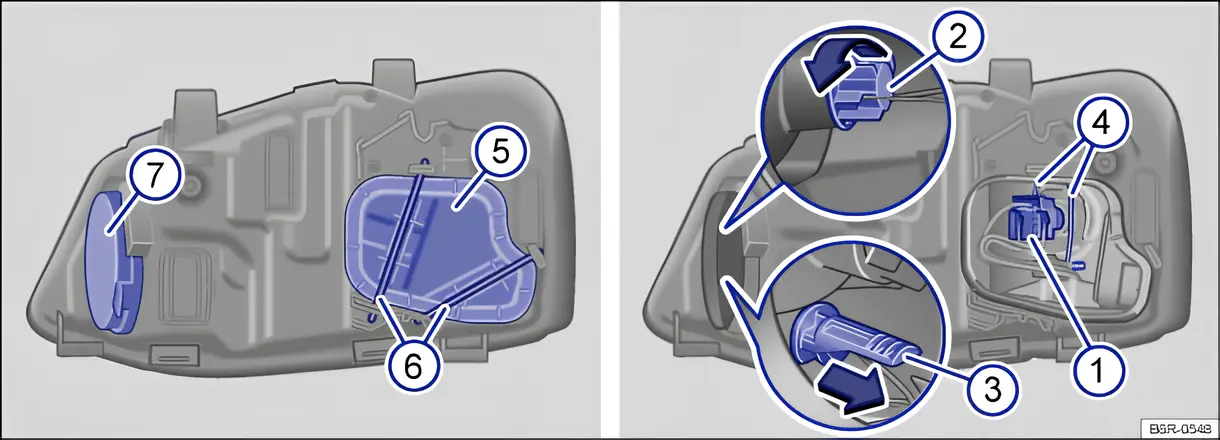
Fig. 180 Rear view of the right-hand H4 headlight with plastic covers: 1 dipped beam and main beam, 2 turn signal and 3 side light.
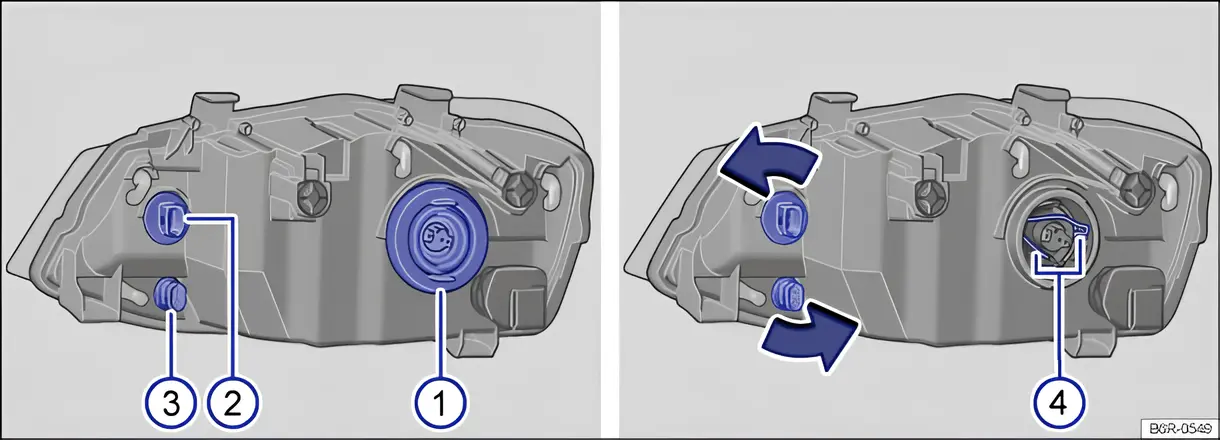
Fig. 181 Rear view of the right-hand H4 headlight with rubber cover: 1 dipped beam and main beam, 2 turn signal and 3 side light.
First read and observe the introductory information and safety warnings .
The headlight must be removed in order to change a bulb.
Replacing bulbs in H4 headlights with plastic covers
Section titled “Replacing bulbs in H4 headlights with plastic covers”The actions should only be carried out in the specified order:
| fig. 180 | 1 | 2 | 3 |
|---|---|---|---|
| Dipped beam and main beam headlights | Front turn signal | Side lights | |
| 1. | Observe and follow the instructions on the checklist ⇒ Checklist | ||
| 2. | Open the bonnet ⇒ ⇒ Opening the bonnet. | ||
| 3. | Release clip 6 from catches and pull off plastic cover 5. | Pull off plastic cover 7. | |
| 4. | Push retaining clip 4 downwards and unhook at side. Pull the bulb and bulb holder out to the rear. | Turn the bulb holder anticlockwise as far as it will go and pull it out to the rear along with the bulb. | Pull the bulb and bulb holder out to the rear. |
| 5. | Remove bulb from bulb holder. If necessary, press the catch on the bulb holder. | ||
| 6. | Replace the defective bulb with a new bulb of the same type. | ||
| 7. | Insert bulb holder with bulb and fix the retaining clip 4 | Insert the bulb holder into the headlight and turn it clockwise as far as it will go. | Insert the bulb holder into the headlight. |
| 8. | Fit the plastic cover 5 and push the clip 6 towards the opposite side until it engages. Then check that it sits correctly. | Put the plastic cover 7 on and check that it is fitted securely. | |
Replacing bulbs in H4 headlights with a rubber cover
Section titled “Replacing bulbs in H4 headlights with a rubber cover”The actions should only be carried out in the specified order:
| fig. 181 | 1 | 2 | 3 |
|---|---|---|---|
| Dipped beam and main beam headlights | Front turn signal | Side lights | |
| 1. | Observe and follow the instructions on the checklist ⇒ Checklist | ||
| 2. | Open the bonnet ⇒ ⇒ Opening the bonnet. | ||
| 3. | Pull off rubber cover. Push retaining clip 4 downwards and unhook at side. Pull the bulb and bulb holder out to the rear. | Turn the bulb holder anticlockwise as far as it will go and pull it out to the rear along with the bulb. | |
| 4. | Remove bulb from bulb holder. If necessary, press the catch on the bulb holder. | ||
| 5. | Replace the defective bulb with a new bulb of the same type. | ||
| 6. | Insert bulb holder with bulb and fix the retaining clip 4. | Insert the bulb holder into the headlight and turn it clockwise as far as it will go. | |
| 7. | Put the rubber cover on and check if it is fitted securely. | ||
The illustrations show the right-hand headlight from the rear. The left-hand headlight is a mirror image of the one shown.
Changing bulbs in the front headlights (halogen H7)
Section titled “Changing bulbs in the front headlights (halogen H7)”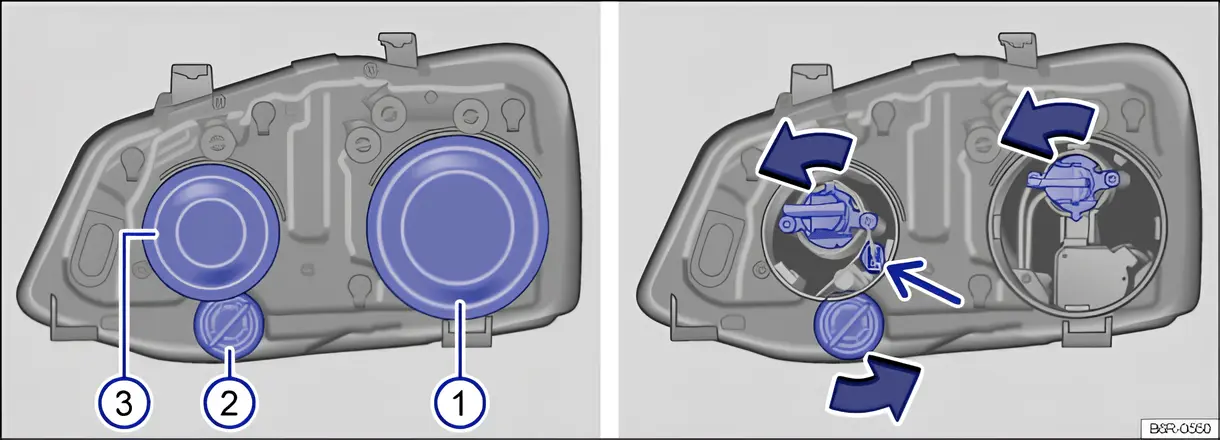
Fig. 182 Rear view of the right-hand H7 front headlight: 1 dipped beam, 2 turn signal, 3 main beam and side light.
First read and observe the introductory information and safety warnings .
The actions should only be carried out in the specified order:
| fig. 182 | 1 | 2 | 3 | 3 |
|---|---|---|---|---|
| Dipped beam headlights | Front turn signal | Main beam headlights | Side light (small bulb holder) | |
| 1. | Observe and follow the instructions on the checklist ⇒ Checklist | |||
| 2. | Open the bonnet ⇒ ⇒ Opening the bonnet. | |||
| 3. | Remove the headlight as necessary. | |||
| 4. | Pull off rubber cover from back of headlight. | Pull off rubber cover from back of headlight. | ||
| 5. | Turn the bulb holder anticlockwise as far as it will go and pull it out to the rear along with the bulb. | Pull the bulb and bulb holder (thin arrow) out to the rear. | ||
| 6. | Pull the bulb straight out of the bulb holder. If applicable, push the catch on the bulb holder. | |||
| 7. | Replace the defective bulb with a new bulb of the same type. | |||
| 8. | Insert the bulb holder into the headlight and turn it clockwise as far as it will go. | Insert the bulb holder into the headlight and push it all the way in. | ||
| 9. | Put the rubber cover on and check if it is fitted securely. | |||
| 10. | Install the headlight as necessary. | |||
The illustrations show the right-hand headlight from the rear. The left-hand headlight is a mirror image of the one shown.
Changing bulbs in the front headlights (Xenon)
Section titled “Changing bulbs in the front headlights (Xenon)”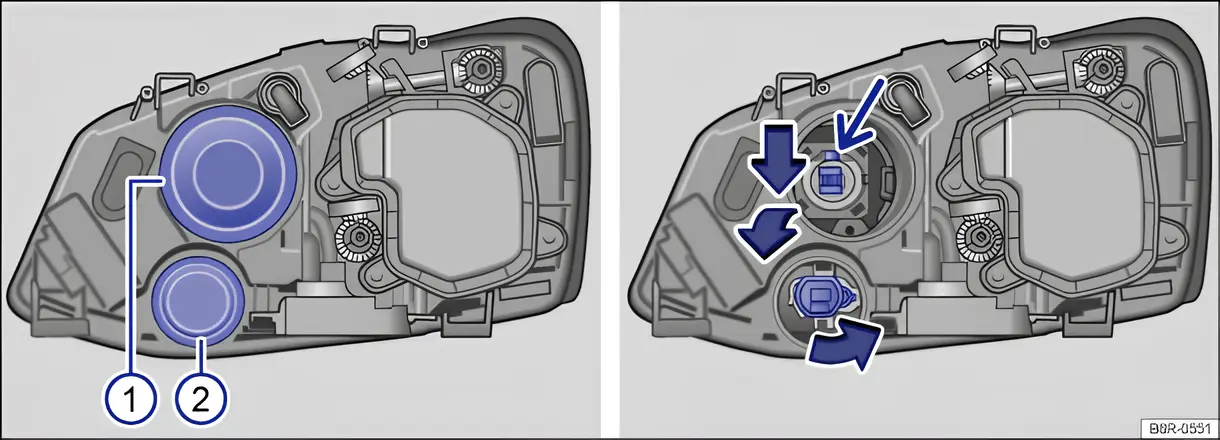
Fig. 183 Rear view of right-hand Xenon headlight: 1 cornering light and 2 turn signal.
First read and observe the introductory information and safety warnings .
The headlight needs to be removed in order to change a bulb.
The actions should only be carried out in the specified order:
| fig. 183 | 1 | 2 |
|---|---|---|
| Dynamic cornering light | Front turn signal | |
| 1. | Observe and follow the instructions on the checklist ⇒ Checklist | |
| 2. | Open the bonnet ⇒ ⇒ Opening the bonnet. | |
| 3. | Pull off rubber cover. | |
| 4. | Push the bulb with the connector down and pull out to the rear of the bulb holder. | Turn the bulb holder anticlockwise as far as it will go and pull it out to the rear along with the bulb. |
| 5. | Remove connector from lamp base. | Pull the bulb straight out of the bulb holder. |
| 6. | Replace the defective bulb with a new bulb of the same type. | |
| 7. | Insert the bulb in the bulb holder with the connector at the bottom and push up. The lug of the bulb (small arrow) must be located in the recess of the bulb holder. | Insert the bulb holder into the headlight and turn it clockwise as far as it will go. |
| 8. | Put the rubber cover back on and check if it is fitted securely. | |
The illustrations show the right-hand headlight from the rear. The left-hand headlight is a mirror image of the one shown.
Changing bulbs in the front bumper
Section titled “Changing bulbs in the front bumper”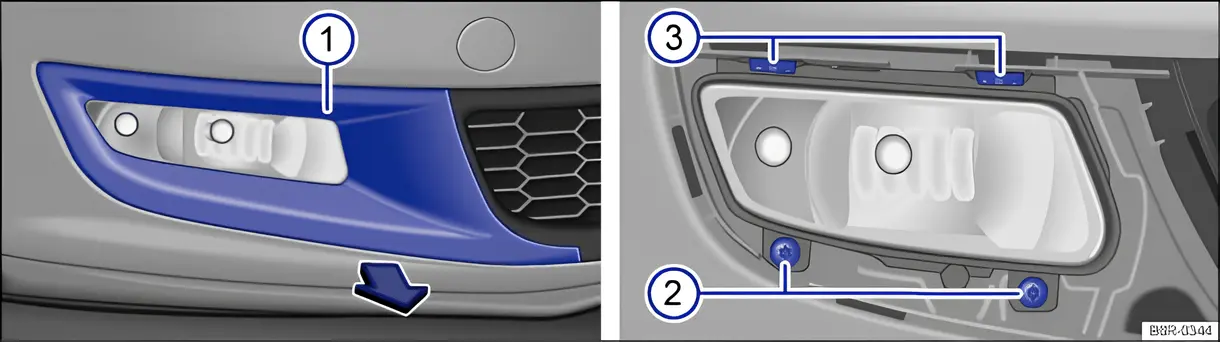
Fig. 184 In the front bumper, right-hand side: removing the cover and headlight.
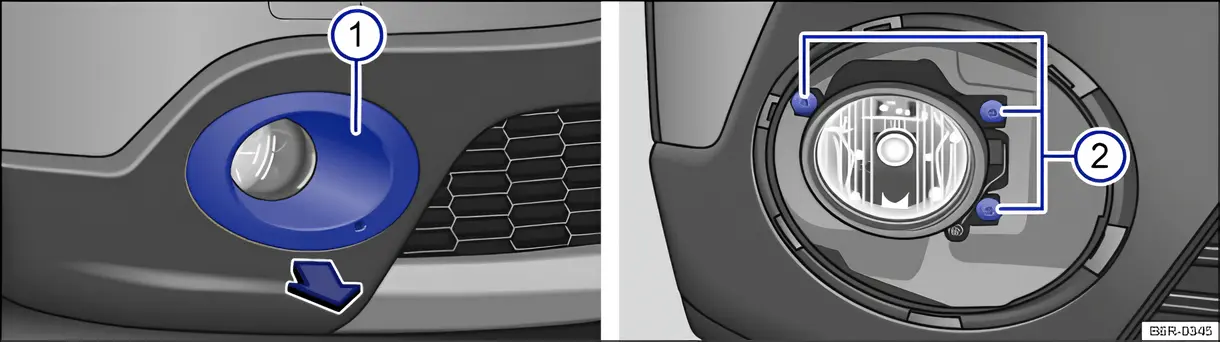
Fig. 185 In the front bumper, right-hand side: removing the cover and headlight (Cross Polo, Polo Sedan).
First read and observe the introductory information and safety warnings .
The actions should only be carried out in the specified order:
| fig. 184 | fig. 185 | |
|---|---|---|
| 1. | Follow the instructions on the checklist ⇒ Checklist | |
| 2. | Remove the screwdriver with Torx bit and the wire hook from the vehicle toolkit in the luggage compartment. | |
| 3. | Fit the wire hook in the cover recess 1 and pull forward with the cover in the direction of the arrow and remove it. | |
| 4. | Remove the securing screws 2 with the screwdriver. | |
| 5. | Release the guide catches 3 by pressing lightly on the retaining lugs. | |
| 6. | Pull the headlight out to the front slightly. | |
| 7. | Disconnect the electrical connector on the rear of the headlight by pressing the connector towards the headlight housing and simultaneously pressing the lug on the connector to disengage. Then remove the connector from the headlight. | |
| 8. | Turn the respective bulb holder anticlockwise as far as it will go and pull it out to the rear along with the bulb. | |
| 9. | Replace the defective bulb with a new bulb of the same type. | |
| 10. | Insert the bulb holder into the headlight and turn it clockwise as far as it will go. Make sure the bulb holder is fitted securely. | |
| 11. | Insert the connector into the appropriate bulb holder. The electrical connector must click into place ⇒ . | |
| 12. | Insert the headlight. First fit it in position and then push it into the upper guides 3 until it engages. Note the position of the recesses in the bumper. | Insert the headlight. Note the position of the recesses in the bumper. |
| 13. | Push the headlight to the rear and tighten the securing screws 2 with the screwdriver. | |
| 14. | Position the cover 1 on the bumper and push it in ⇒ . Then check that it sits correctly. | |
The illustrations show the right-hand headlight. The left-hand headlight is a mirror image of the one shown.
Changing the bulbs in the tail light cluster
Section titled “Changing the bulbs in the tail light cluster”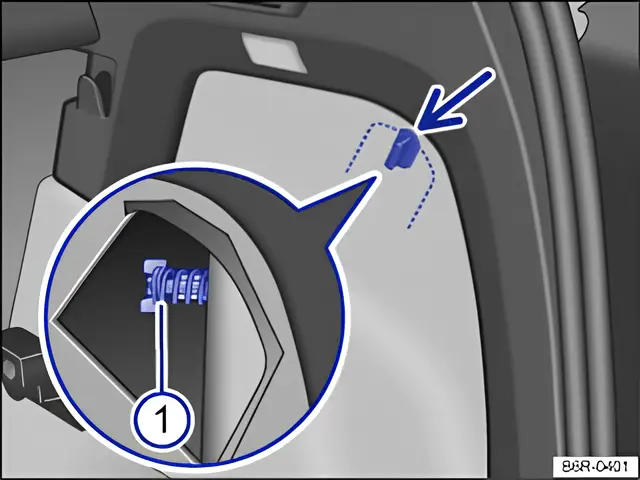
Fig. 186 On the side of the luggage compartment: removing the tail light cluster
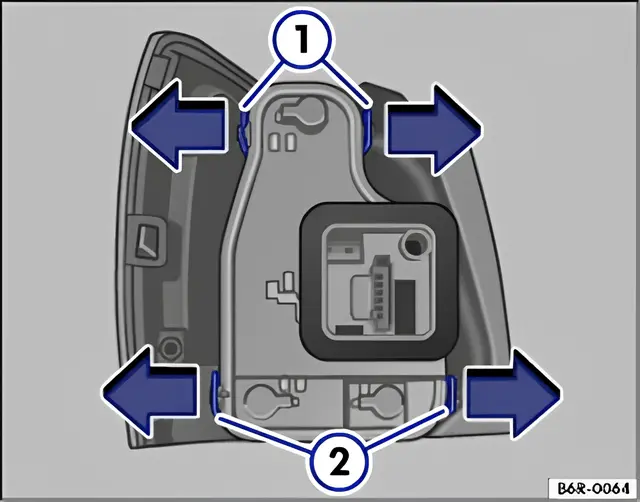
Fig. 187 Tail light cluster: removing the bulb holder.
First read and observe the introductory information and safety warnings .
The steps should only be carried out in the specified order.
Removing the tail light cluster
Section titled “Removing the tail light cluster”- Observe and follow the instructions on the checklist.
- Open the tailgate.
- Turn the sash fastener (arrow) ⇒ fig. 186 in the side trim of the luggage compartment to the side.
- Hold the sash fastener and pull out the pre-cut cover in the side trim.
- Push together the catches on the connector and pull out the connector.
- Unscrew the securing bolt 1 by hand.
- Carefully pull the tail light cluster to the rear to remove it from the body. Place it on a clean, smooth surface.
Changing the bulb
Section titled “Changing the bulb”- To release the bulb holder, push the tabs ⇒ fig. 187 1 and 2 in the direction of the arrows.
- Remove the bulb holder from the tail light cluster.
- Replace the defective bulb with a new bulb of the same type.
- Insert the bulb holder into the tail light cluster. All release tabs must click into place.
Fitting the tail light cluster
Section titled “Fitting the tail light cluster”- Carefully put the tail light cluster into the opening in the body.
- Use one hand to hold the tail light cluster in the fitting position while using the other hand to screw the securing bolt firmly back on ⇒ fig. 186 1.
- Check that the tail light cluster is positioned correctly and securely.
- Connect the connector to the bulb holder until it engages.
- Fit the side trim back into the luggage compartment.
- Close the tailgate.
Changing the bulb in the number plate light
Section titled “Changing the bulb in the number plate light”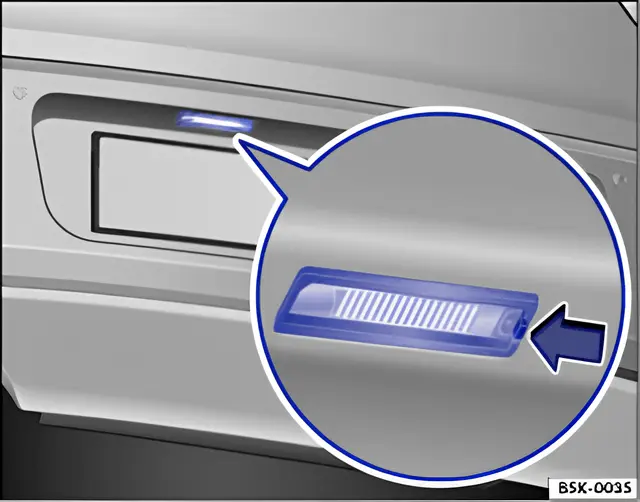
Fig. 188 In the rear bumper: number plate light
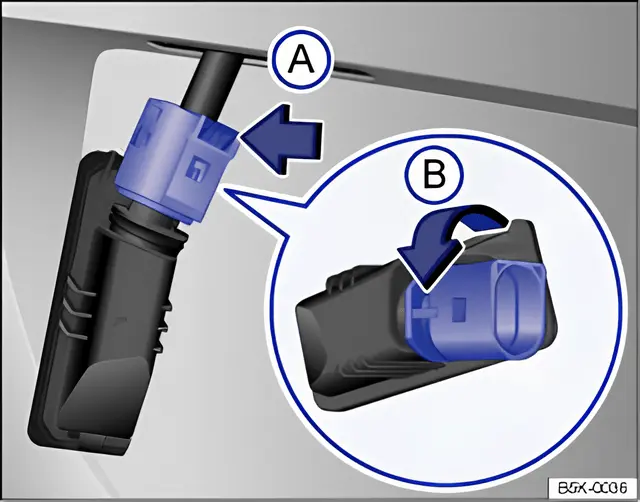
Fig. 189 Number plate light: removing the bulb holder.
First read and observe the introductory information and safety warnings .
A normal flat screwdriver can be used to remove the number plate light ⇒ .
The actions should only be carried out in the specified order:
- Observe and follow the instructions on the checklist.
- Insert a screwdriver into the recess on the number plate light in the direction of the arrow ⇒ fig. 188.
- Pull the number plate light out slightly.
- Push the catch on the connector in the direction of the arrow ⇒ fig. 189 A and pull the connector out.
- Turn the bulb holder in the direction of the arrow B and pull it out together with the bulb.
- Replace the defective bulb with a new bulb of the same type.
- Insert the bulb holder into the number plate light and turn it as far as it will go in the opposite direction to the arrow B.
- Connect the connector to the bulb holder.
- Carefully put the number plate light into the opening in the body. Ensure that you put the number plate light in the right way round.
- Push the number plate light into the bumper until it clicks into place.
Changing bulbs in the side turn signals
Section titled “Changing bulbs in the side turn signals”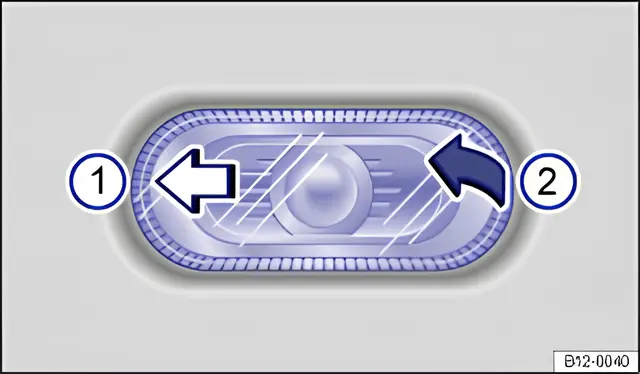
Fig. 190 Removing the side turn signal bulb
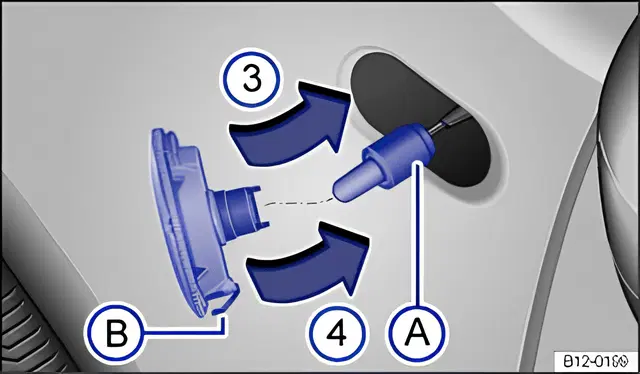
Fig. 191 Side turn signal: changing the bulb.
First read and observe the introductory information and safety warnings .
Depending on the vehicle, the side turn signal may be located in the front wing or in the exterior mirror ⇒ Side view.
Please contact a qualified workshop to have the side turn signal in the exterior mirror changed. Volkswagen recommends using a Volkswagen dealership for this purpose.
Turn signal in the front wing
Section titled “Turn signal in the front wing”The actions should only be carried out in the specified order:
- Observe and follow the instructions on the checklist ⇒ Checklist.
- With one hand, push the side turn signal to the front ⇒ fig. 190 1.
- Manually lever the side turn signal out of the vehicle body 2.
- Pull out the bulb holder with the bulb ⇒ fig. 191 A.
- Pull the bulb straight out of the bulb holder.
- Replace the defective bulb with a new bulb of the same type.
- Replace the bulb holder.
- Insert the side turn signal into the body, with the side facing the rear of the vehicle first 3 and push it into the body 4 until you hear that the spring B has engaged.