Adjusting the seat position
Introduction
Section titled “Introduction”This chapter contains information on the following subjects:
- The dangers of assuming an incorrect sitting position
- Correct sitting position
- Mechanical controls on the front seats
- Adjusting the head restraints
- Removing and fitting head restraints
- Adjusting the steering wheel position
- Centre armrest
Number of seats
Section titled “Number of seats”The vehicle has a total of 5 seats: 2 at the front and 3 at the rear. Each seat is equipped with a seat belt.
Additional information and warnings
Section titled “Additional information and warnings”The dangers of assuming an incorrect sitting position
Section titled “The dangers of assuming an incorrect sitting position”First read and observe the introductory information and safety warnings .
If the seat belts are not worn or are worn incorrectly, the risk of severe or fatal injuries increases. Seat belts can only provide optimal protection if the seat belt routing is correct. Assuming an incorrect sitting position considerably impairs the level of protection provided by a seat belt. This could lead to severe or even fatal injuries. The risk of severe or fatal injuries is especially increased when a triggering airbag strikes an occupant who has assumed an incorrect sitting position. The driver is responsible for all vehicle passengers, especially if they are children.
The following list contains examples of sitting positions that could be dangerous for all occupants.
Whenever the vehicle is in motion
Section titled “Whenever the vehicle is in motion”- Never stand in the vehicle.
- Never stand on the seats.
- Never kneel on the seats.
- Never tilt the backrest too far to the rear.
- Never lean against the dash panel.
- Never lie on the rear bench seat.
- Never sit on the front edge of a seat.
- Never sit sideways.
- Never lean out of a window.
- Never put your feet out of a window.
- Never put your feet on the dash panel.
- Never place your feet on the seat cushion or seat backrest.
- Never travel in a footwell.
- Never sit on the front armrest.
- Never travel on a seat without wearing the seat belt.
- Never travel in the luggage compartment.
Correct sitting position
Section titled “Correct sitting position”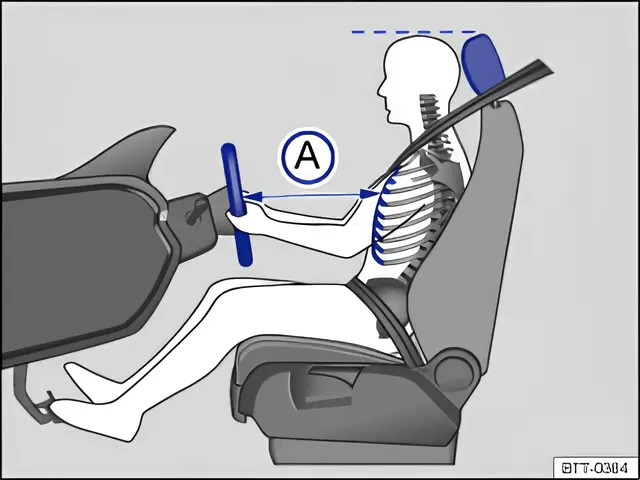
Fig. 35 There must be a distance A of at least 25 cm between the driver and the steering wheel
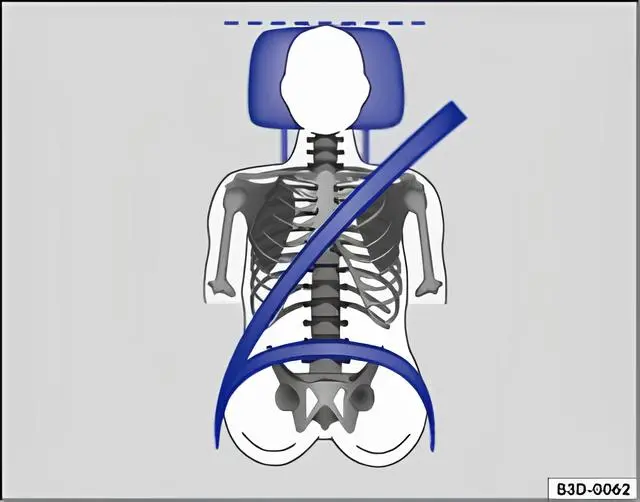
Fig. 36 Correct seat belt routing and head restraint adjustment
First read and observe the introductory information and safety warnings .
The following details the correct sitting positions for the driver and passengers.
If any vehicle occupants cannot assume a correct sitting position due to their physical build, they should contact a qualified workshop to find out about possible special modifications. The seat belts and airbags can only provide a maximum level of protection if a correct sitting position is assumed. Volkswagen recommends using a Volkswagen dealership for this purpose.
Volkswagen recommends the following seating position for your own safety and to reduce the level of injury in the event of a sudden braking manoeuvre or an accident:
The following applies to all vehicle occupants:
- Adjust the head restraint so that its upper edge is at the same height as the top of the head, but not lower than eye level. Position the back of your head as close to the head restraint as possible ⇒ fig. 35 and fig. 36.
- When adjusting for short people, push the head restraint all the way down, even if the head is then underneath the top edge of the head restraint.
- For taller people, push the head restraint up as far as it will go.
- Move the backrest into an upright position so that your back rests fully against it.
- Keep both feet in the footwell while the vehicle is in motion.
- Adjust and fasten seat belts properly.
Additional points for the driver:
- Adjust the steering wheel so that the distance fig. 35 A between the steering wheel and your breastbone is at least 25 cm and the circumference of the steering wheel can be held at the sides with the arms slightly bent.
- The steering wheel must always point towards the breastbone and not towards the face.
- Adjust the driver seat so that you are able to press the pedals with your knees still slightly bent.
- Adjust the height so that you can reach the highest point of the steering wheel.
- Always leave both feet in the footwell, to help ensure you maintain control of the vehicle at all times.
Additional points for the front passenger:
- Push the front passenger seat as far back as possible so that the airbag can provide maximum protection if it is triggered.
Mechanical controls on the front seats
Section titled “Mechanical controls on the front seats”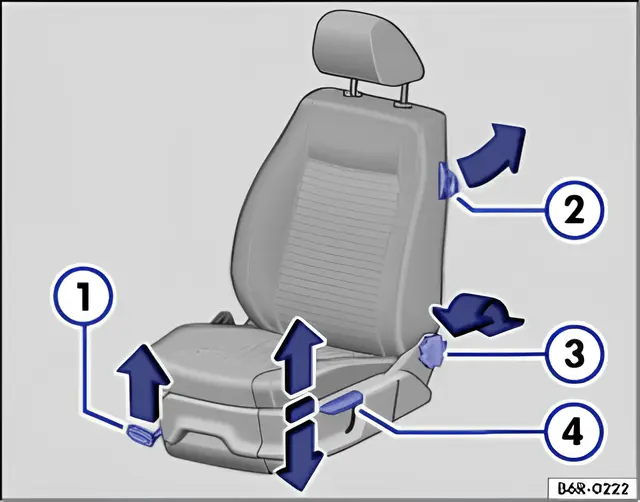
Fig. 37 Front left seat controls with convenient entry function
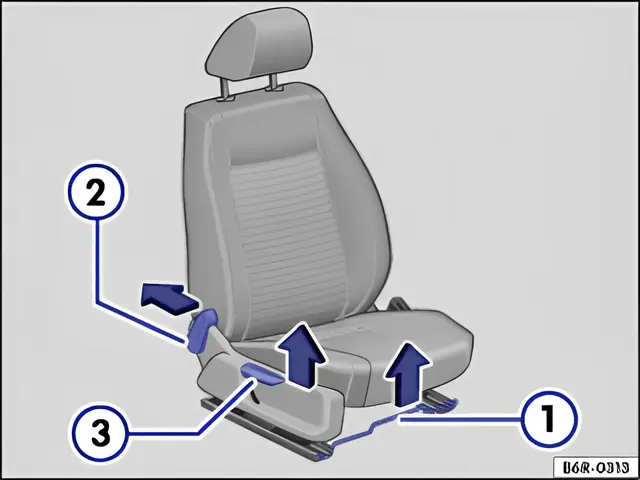
Fig. 38 Front right seat controls without convenient entry function
First read and observe the introductory information and safety warnings .
Front left seat controls with convenient entry function
Section titled “Front left seat controls with convenient entry function”The controls on the right front seat are arranged symmetrically to those on the left.
| fig. 37 | Function | Action |
|---|---|---|
| 1 | Moving the front seat forwards and backwards. | Pull the lever and move the front seat. The front seat must engage after the lever is released. |
| 2 | Folding the backrest forwards or backwards (2-door vehicles only). | Folding forwards: pull the lever and fold the backrest forwards. Move the seat forwards at the same time if necessary. |
Folding backwards: pull the lever and fold the backrest backwards. The backrest must engage. Move the seat all the way back if necessary. | ||
| 3 | Adjusting the backrest. | Turn the handwheel. |
| 4 | Adjusting the seat height. | Move the lever up or down several times if necessary. |
Front right seat controls without convenient entry function
Section titled “Front right seat controls without convenient entry function”The controls on the left front seat are arranged symmetrically.
| fig. 38 | Function | Action |
|---|---|---|
| 1 | Moving the front seat forwards and backwards. | Pull the bar upwards and move the front seat. The front seat must engage after the bar is released. |
| 2 | Adjusting the backrest. | Push the lever backwards and adjust the backrest. The backrest must engage after the lever is released ⇒ ! |
| 3 | Adjusting the seat height. | Pull the lever up and change the seat height by shifting your body weight. The seat must engage after the lever is released. |
Adjusting the head restraints
Section titled “Adjusting the head restraints”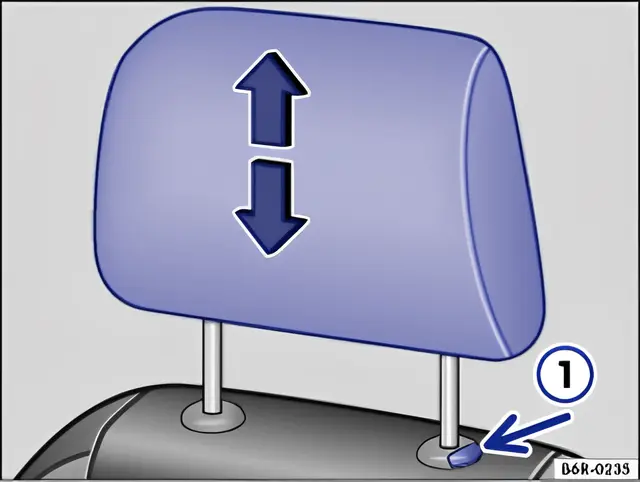
Fig. 39 Adjusting a front head restraint
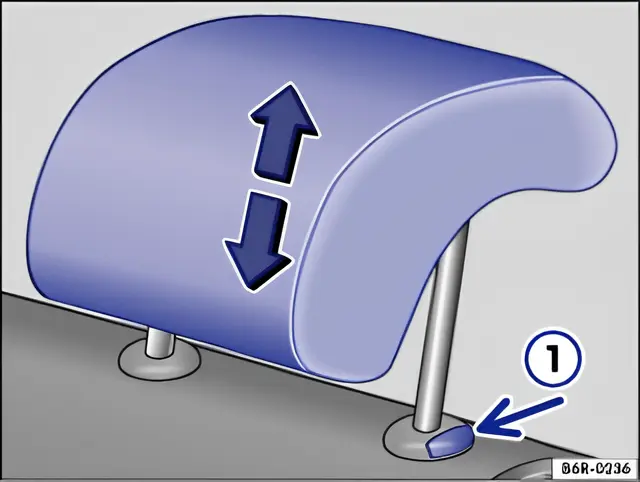
Fig. 40 Adjusting a rear head restraint
First read and observe the introductory information and safety warnings .
All seats are equipped with head restraints. The centre rear head restraint is intended for the centre seat on the rear bench seat only. It must therefore not be fitted in any other position.
Adjusting the height
Section titled “Adjusting the height”- Push the head restraint upwards in the direction of the arrow, or press the button ⇒ fig. 39 1 or fig. 40 1 and push the head restraint down ⇒ .
- The head restraint must engage properly in position.
Correct head restraint setting
Section titled “Correct head restraint setting”Adjust the head restraint so that its upper edge is at the same height as the top of the head, but not lower than eye level. Position the back of your head as close to the head restraint as possible.
Head restraint setting for shorter people
Section titled “Head restraint setting for shorter people”Push the head restraint all the way down, even if the head is then underneath the top edge of the head restraint. There may be a small gap between the head restraint and the backrest in the lowest position.
Head restraint setting for taller people
Section titled “Head restraint setting for taller people”Push the head restraint up as far as it will go.
Removing and fitting head restraints
Section titled “Removing and fitting head restraints”First read and observe the introductory information and safety warnings .
All seats are equipped with head restraints. The centre rear head restraint is intended for the centre seat on the rear bench seat only. It must therefore not be fitted in any other position.
Removing the head restraint
Section titled “Removing the head restraint”- Release the backrest and fold it forwards if necessary ⇒ Luggage compartment.
- Push the head restraint up as far as it will go ⇒ .
- Hold down button 1 fig. 39 or fig. 40 and pull the head restraint all the way out.
- Fold the backrest back and secure it if necessary.
Fitting the head restraint
Section titled “Fitting the head restraint”- Release the backrest and fold it forwards if necessary ⇒ Luggage compartment.
- Position the head restraint correctly above the head restraint guides and insert the guides into the appropriate backrest.
- Hold down button 1 fig. 39 or fig. 40 and push the head restraint down.
- Fold the backrest back and secure it if necessary.
- Adjust the head restraint to suit the correct sitting position ⇒ Adjusting the head restraints.
Adjusting the steering wheel position
Section titled “Adjusting the steering wheel position”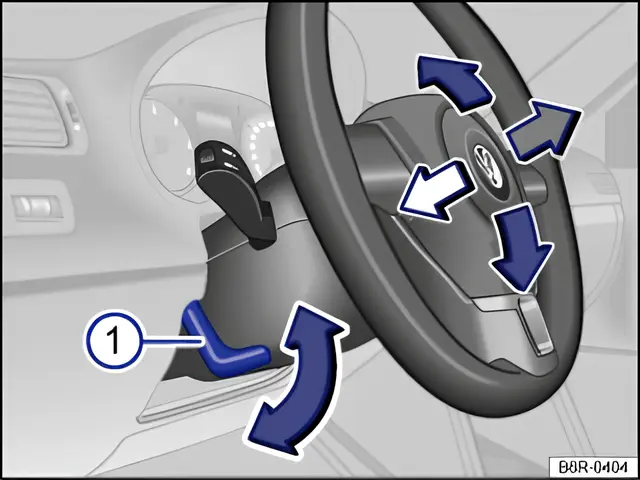
Fig. 41 Adjusting the steering wheel position mechanically
First read and observe the introductory information and safety warnings .
The steering wheel must only be adjusted before setting off and when the vehicle is stationary.
- Fold lever ⇒ fig. 41 1 downwards.
- Adjust the steering wheel so that it can be held at the sides on its outer edge with both hands and the arms slightly bent (9 o’clock and 3 o’clock positions).
- Push the lever firmly upwards until it lies flush against the steering column ⇒ .
Centre armrest
Section titled “Centre armrest”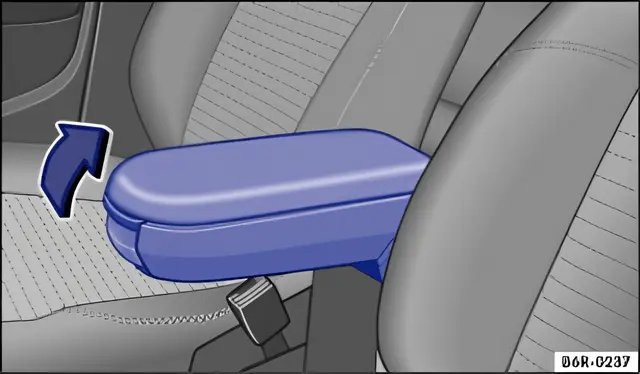
Fig. 42 Front centre armrest
First read and observe the introductory information and safety warnings .
To raise the centre armrest, pull it up in stages in the direction of the arrow ⇒ fig. 42.
To lower the centre armrest, pull it all the way up. Then fold the centre armrest down.