Filling the tank
Introduction
Section titled “Introduction”This chapter contains information on the following subjects:
- Indicator lamps and fuel gauge
- Filling the tank with petrol or diesel
- Refuelling autogas
- Capacities
- Checks when filling the tank
The tank flap is located at the rear right of the vehicle.
Autogas vehicles have 2 fuel tanks: one for autogas and one for petrol.
Additional information and warnings
Section titled “Additional information and warnings”Fuel can pollute the environment. Collect any spilt operating fluids and dispose of them properly.
The tank flap cannot be released in an emergency. Seek expert assistance if necessary.
Indicator lamps and fuel gauge
Section titled “Indicator lamps and fuel gauge”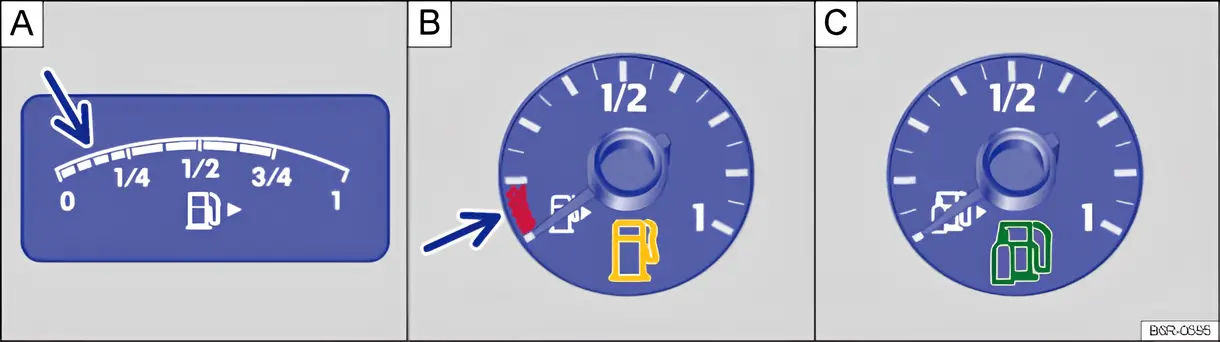
Fig. 131 a) In the instrument cluster. Variants A and B: fuel gauges for petrol and diesel; variant C: fuel gauge for autogas
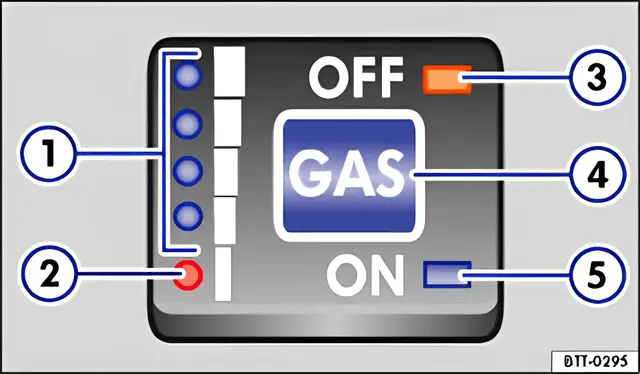
Fig. 131 b) Variant C: in the centre console: fuel gauge and the switch for autogas mode (models with the 1.4 CMAA engine from 2010)
First read and observe the introductory information and safety warnings .
- Autogas level gauge
- Reserve lamp
- Indicator lamp off (petrol mode)
- Autogas changeover button
- Indicator lamp lit (autogas mode)
When the autogas runs out, the engine changes over to petrol mode.
Fuel gauge
Section titled “Fuel gauge”| Lights up | Needle position fig. 131 a) | Possible cause ⇒ | Solution |
|---|---|---|---|
| Reserve marking or red marking (arrow). | Fuel tank almost empty. The reserve capacity has been used ⇒ Capacities. | Fill the tank at the earliest opportunity ⇒ | |
| — | The vehicle is in autogas mode. | — | |
| — | Water in the fuel in a vehicle with a diesel engine. | Switch off the engine and seek expert assistance ⇒ Fuel. |
Several warning and indicator lamps will light up briefly as a functional check when the ignition is switched on. They will switch off after a few seconds.
Autogas engines
Section titled “Autogas engines”a) Polo 6R 1.4 BiFuel CMAA (03/2010–06/2010)
| fig. 131 b) | Status/warning signal | Possible cause ⇒ | Solution |
|---|---|---|---|
| 1 lit | Autogas tank full. The lamps go out from the top down as the autogas level falls. | — | |
| 2 lit | Autogas tank almost empty. The reserve capacity has been used ⇒ Capacities. | Refuel with autogas at the earliest opportunity ⇒ | |
| 3 lit | Autogas tank empty. | Press the GAS changeover button 4 to switch the warning tone off. Refuel with autogas at the earliest opportunity ⇒ . | |
5 flashing Warning tone at long intervals. |
b) Polo 6R 1.6 BiFuel CNKA (01/2011–03/2014)
The yellow indicator lamp lights up when the petrol level has dropped to the reserve.
The green indicator lamp lights up when the vehicle is in autogas mode.
The green indicator lamp goes out when the vehicle changes over to petrol mode, automatically or manually.
Special feature: if the vehicle has been parked for a long period immediately after refuelling, the autogas gauge needle may not show exactly the same level after the next start as it did immediately after refuelling. This does not necessarily indicate a leak in the system.
The small arrow next to the pump symbol in the instrument cluster ⇒ fig. 131 a) shows which side of the vehicle the tank flap is on.
Filling the tank with petrol or diesel
Section titled “Filling the tank with petrol or diesel”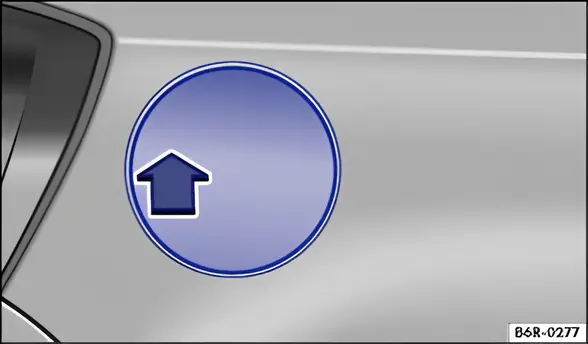
Fig. 132 At the rear right of the vehicle: opening the tank flap
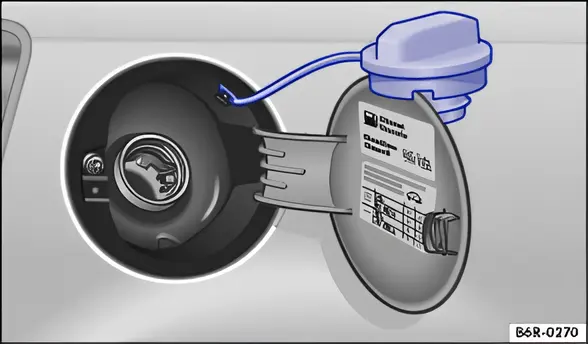
Fig. 133 Open tank flap with the tank cap hooked in place
First read and observe the introductory information and safety warnings .
Before refuelling, always switch off the engine, the ignition and your mobile telephone, and leave them switched off while refuelling.
Opening the tank cap
Section titled “Opening the tank cap”- Unlock the vehicle with the vehicle key or with the central locking button in the driver door ⇒ Central locking system.
- The tank flap is on the right-hand side of the vehicle.
- Press the tank flap in the direction of the arrow ⇒ fig. 132. The tank flap springs out slightly.
- Lift the tank flap that has sprung out.
- Unscrew the tank cap anti-clockwise and hook it onto the tank flap ⇒ fig. 133.
Filling the tank
Section titled “Filling the tank”The correct fuel type for the vehicle is given on the sticker on the inside of the tank flap ⇒ Fuel.
- The fuel tank is full as soon as a correctly operated automatic fuel nozzle switches off for the first time ⇒ .
- Do not continue refuelling after the nozzle has switched off. This fills the expansion space in the fuel tank, and fuel can leak out if it warms up.
Closing the tank cap
Section titled “Closing the tank cap”- Screw the tank cap clockwise onto the filler neck until it audibly engages.
- Close the tank flap until it audibly engages. The tank flap must be flush with the bodywork.
Spilt fuel can pollute the environment.
Refuelling autogas
Section titled “Refuelling autogas”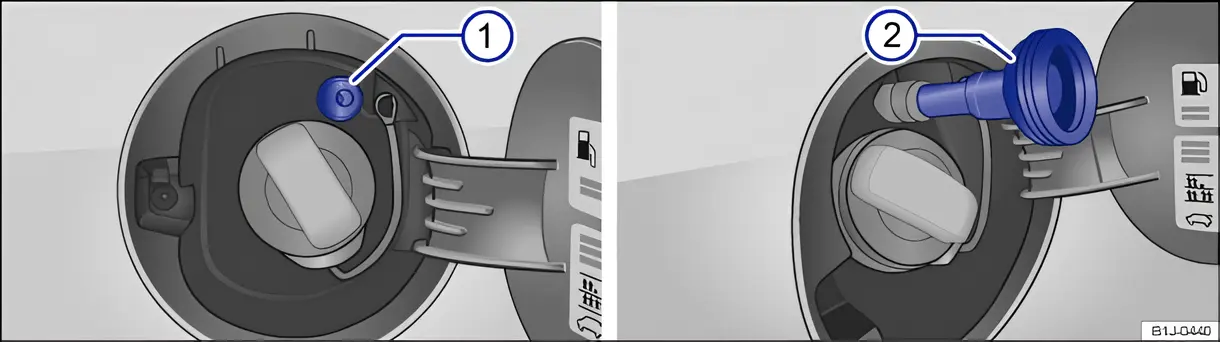
Fig. 134 At the rear right of the vehicle: open tank flap with the cap on the autogas filler neck 1 and the adapter 2.
First read and observe the introductory information and safety warnings .
Before refuelling, switch off the engine, the ignition and your mobile telephone ⇒ .
Read and observe the operating instructions for the autogas filling equipment.
Opening the tank cap
Section titled “Opening the tank cap”The autogas filler neck is under the tank flap, next to the petrol filler neck.
- Unlock the vehicle with the vehicle key or with the central locking button in the driver door ⇒ Central locking system.
- The tank flap is on the right-hand side of the vehicle.
- Press the tank flap in the direction of the arrow ⇒ fig. 132. The tank flap springs out slightly.
- Lift the tank flap that has sprung out.
Filling the tank
Section titled “Filling the tank”- Unscrew the cap from the autogas filler neck ⇒ fig. 134 1 by turning it anti-clockwise.
- Screw the required adapter 2 clockwise onto the autogas filler neck.
- Fill the tank as described in the instructions for the filling equipment.
- The tank is full when the compressor of the filling equipment switches off automatically.
- To stop refuelling earlier, release the button on the filling equipment.
Closing the tank cap
Section titled “Closing the tank cap”- Unscrew the adapter 2 from the autogas filler neck anti-clockwise and stow it safely.
- Screw the cap clockwise back onto the autogas filler neck 1.
- Close the tank flap until it audibly engages. The tank flap must be flush with the bodywork.
One adapter for the relevant market is supplied with the vehicle. It is generally advisable to obtain all the adapters and carry them in the vehicle, as different filling systems are used in different countries.
At very high ambient temperatures, the overheating protection of the filling equipment may switch off automatically.
At very high ambient temperatures, the pressure in the vehicle’s autogas tank may be the same as or higher than the pressure in the tank of the filling equipment. For physical reasons, the vehicle cannot then be refuelled.
Autogas filling adapters can differ in how they are operated. If in doubt, have the refuelling carried out by trained filling station staff.
Noises during refuelling are normal and do not indicate a fault in the system.
Capacities
Section titled “Capacities”First read and observe the introductory information and safety warnings .
| Fuel tank capacity | |
|---|---|
| Petrol and diesel engines | approx. 45 l, including a reserve of approx. 7 l. |
| Autogas engines a) | Autogas: approx. 52 l Petrol: approx. 45 l, including a reserve of approx. 7 l. |
a) - The capacity depends on the outside temperature and on the characteristics of the autogas filling equipment. At very high outside temperatures the autogas tank may not be able to be filled completely.
Checks when filling the tank
Section titled “Checks when filling the tank”First read and observe the introductory information and safety warnings .
Checklist
Section titled “Checklist”Never carry out any work on the engine or in the engine compartment if you are not familiar with the requisite procedures and general safety requirements, or if you only have access to incorrect operating equipment, service fluids and unsuitable tools ⇒ Preparing to work in the engine compartment. The work should be carried out by a qualified workshop if you are uncertain. Please ensure that the following are checked regularly, preferably every time you fill the tank:
- Windscreen washer fluid level
- Engine oil level ⇒ Engine oil
- Engine coolant level ⇒ Coolant
- Brake fluid level ⇒ Braking, stopping and parking
- Tyre pressure ⇒ Wheels and tyres
- Vehicle lighting necessary for traffic safety:
- Turn signals
- Side lights, dipped beam headlights and main beam headlights
- Tail light cluster
- Brake lights
- Rear fog light
Information on changing bulbs ⇒ Changing a bulb.