Changing a wheel
Introduction
Section titled “Introduction”This chapter contains information on the following subjects:
- Preparations for changing a wheel
- Wheel bolts
- Lifting the vehicle with the jack
- Changing a wheel
- After changing a wheel
Some models are delivered without a factory-fitted jack or box spanner. If this is the case, the wheel should be changed by a qualified workshop.
The vehicle jack supplied with the vehicle is only designed for changing a wheel when one vehicle tyre is damaged and has to be replaced. Seek expert assistance if both tyres on one side of the vehicle, both tyres on one axle, or all tyres are damaged.
Only change the wheel yourself when the car is parked in a safe place, you are familiar with the necessary steps and safety procedures and you have access to all the correct tools. Seek expert assistance if this is not the case.
Additional information and warnings
Section titled “Additional information and warnings”Preparations for changing a wheel
Section titled “Preparations for changing a wheel”First read and observe the introductory information and safety warnings .
Checklist
Section titled “Checklist”The following actions must always be carried out in the given order in preparation for changing the wheel ⇒ :
- In the event of a flat tyre, park your vehicle on a firm and level surface at a safe distance from the flow of traffic.
- Apply the handbrake firmly.
- Automatic gearbox: move the selector lever to position P.
- Stop the engine and remove the key from the ignition.
- Manual gearbox: select a gear.
- Ensure that all vehicle occupants exit the vehicle and go straight to a safe place, e.g. behind the safety barrier.
- Chock the wheel opposite the wheel being worked on with a stone or a similar object.
- When towing a trailer, unhitch the trailer from the vehicle and park it properly.
- Remove any items of luggage from the luggage compartment.
- Remove the spare wheel or temporary spare wheel and vehicle toolkit from the luggage compartment.
- Remove the hubcaps.
Wheel bolts
Section titled “Wheel bolts”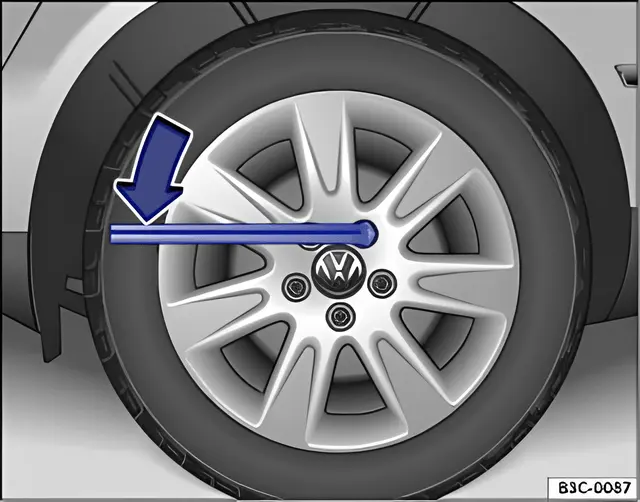
Fig. 168 Changing a wheel: loosening the wheel bolts
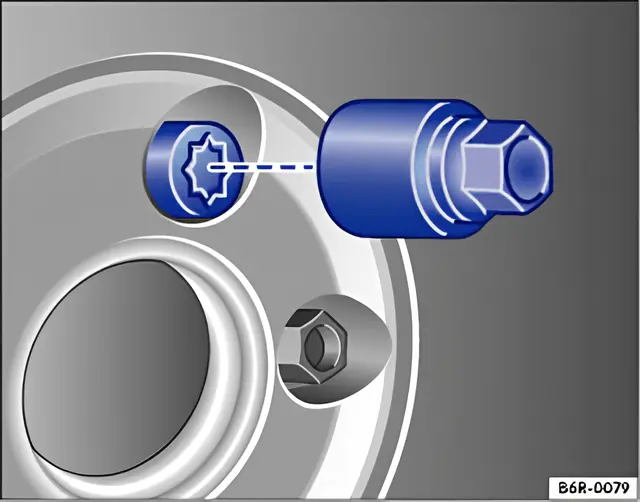
Fig. 169 Changing a wheel: anti-theft bolt and adapter
First read and observe the introductory information and safety warnings .
Only the spanner delivered with the vehicle should be used to loosen the wheel bolts.
Only loosen the wheel bolts by approximately one turn before raising the vehicle with the vehicle jack.
If the wheel bolt is very tight, you may be able to loosen it by pushing down the end of the spanner carefully with your foot. Hold on to the car for support and take care not to slip.
Loosening the wheel bolts
Section titled “Loosening the wheel bolts”- Fit the box spanner over the wheel bolt ⇒ fig. 168 as far as it will go.
- Hold the end of the box spanner and turn the wheel bolt one turn anticlockwise ⇒
Loosening the anti-theft wheel bolt
Section titled “Loosening the anti-theft wheel bolt”- Take the adapter for anti-theft wheel bolts out of the vehicle toolkit.
- Insert the adapter into the anti-theft wheel bolt ⇒ fig. 169. Push it in as far as it will go.
- Insert the box spanner into the adapter as far as it will go.
- Hold the end of the box spanner and turn the wheel bolt one turn anticlockwise ⇒
Important information about the wheel bolts
Section titled “Important information about the wheel bolts”The design of the wheel rims and wheel bolts is matched to the factory-fitted wheels. If different rims are fitted, the correct wheel bolts with the right length and correctly shaped bolt heads must be used. This ensures that wheels are fitted securely and that the brake system works properly.
In certain circumstances, wheel bolts from a vehicle of the same model series may not be used.
Tightening torque for the wheel bolts
Section titled “Tightening torque for the wheel bolts”The tightening torque for wheel bolts for steel and alloy wheels is 120 Nm. The tightening torque should be checked with a torque wrench immediately after changing a wheel.
If the wheel bolts are corroded and difficult to turn, they must be replaced and the wheel hub threads cleaned before the tightening torque is checked.
Never grease or lubricate the wheel bolts or the threads of the wheel hub. This could cause them to loosen while the vehicle is in motion, even if the required torque setting is used.
Lifting the vehicle with the jack
Section titled “Lifting the vehicle with the jack”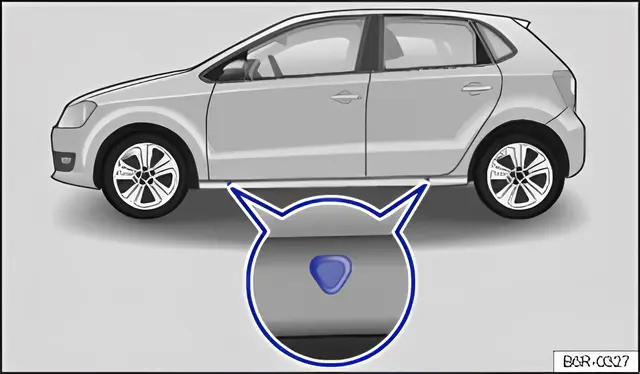
Fig. 170 Jacking points for the vehicle jack (mirrored on the right-hand side of the vehicle)
First read and observe the introductory information and safety warnings .
The jack may be applied only at the jacking points shown (markings on the body) ⇒ fig. 170. Always use the jacking point closest to the wheel you are working on. Raise the vehicle using only the designated jacking points.
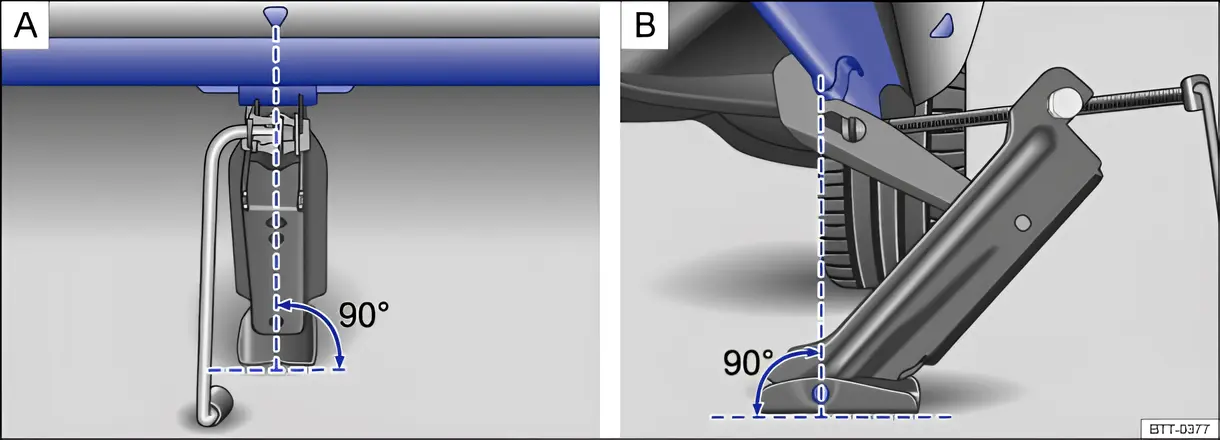
Fig. 171 Vehicle jack at the rear left-hand side of the vehicle
Checklist
Section titled “Checklist”To ensure your own safety and that of your passengers, observe the following actions in the specified order ⇒ :
- Find a firm and level surface suitable for lifting the vehicle.
- Stop the engine, select a gear on a manual gearbox or, in the case of an automatic gearbox, move the selector lever to position P. Apply the handbrake.
- Chock the wheel diagonally opposite using the collapsible chocks or other suitable objects.
- When towing a trailer, unhitch the trailer from the vehicle and park it properly.
- Loosen the wheel bolts on the wheel that is being changed.
- Find the jacking point ⇒ fig. 170 under the vehicle which is closest to the wheel that is being changed.
- Raise the vehicle jack until it just fits under the jacking point of the vehicle.
- Ensure that the entire surface of the foot of the vehicle jack is resting securely on the ground and that the foot of the vehicle jack is positioned precisely, i.e. vertically beneath the point of application ⇒ fig. 171.
- Position the vehicle jack. At the same time, continue to crank the claw up until it is in position around the vertical rib underneath the vehicle ⇒ fig. 171.
- Crank the vehicle jack further until the wheel is just clear of the ground.
Changing a wheel
Section titled “Changing a wheel”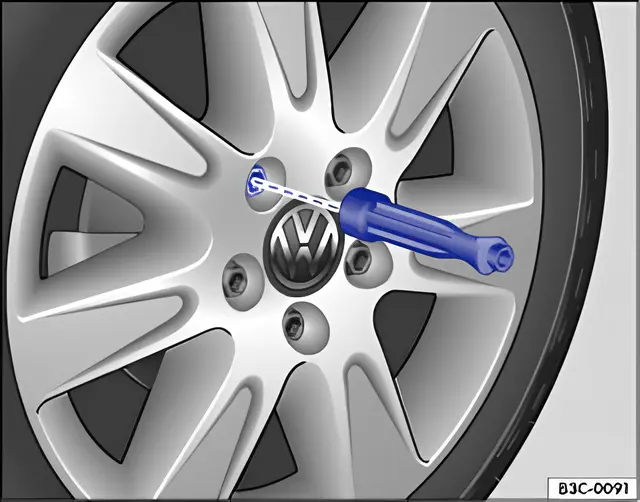
Fig. 172 Changing the wheel: removing the wheel bolts with the screwdriver handle
First read and observe the introductory information and safety warnings .
Removing the wheel
Section titled “Removing the wheel”- Read the checklist.
- Loosen the wheel bolts.
- Jack up the vehicle.
- Using the hexagonal socket in the screwdriver handle ⇒ fig. 172, unscrew the loosened wheel bolts, remove and place on a clean surface.
- Remove the wheel.
Fitting the spare wheel or temporary spare wheel
Section titled “Fitting the spare wheel or temporary spare wheel”Note any specific tyre running direction.
- Position the spare wheel / temporary spare wheel.
- Screw in all the other wheel bolts in a clockwise direction and use the hexagonal socket in the screwdriver handle to tighten them gently.
- Use the adapter for anti-theft wheel bolts where appropriate.
- Lower the vehicle with the jack.
- Use the box spanner to tighten all the wheel bolts securely in a clockwise direction ⇒ . Do not tighten the bolts in clockwise or anticlockwise sequence. Tighten them in diagonal sequence.
- Fit the centre cover caps or wheel covers.
After changing a wheel
Section titled “After changing a wheel”First read and observe the introductory information and safety warnings .
- Clean the tools as necessary and place them back in the toolbox in the luggage compartment.
- Stow the spare wheel, temporary spare wheel or the removed wheel safely in the luggage compartment.
- The tightening torque of the wheel bolts should be checked immediately with a torque wrench.
- The damaged wheel should be replaced as soon as possible.
In vehicles with a Tyre Pressure Loss Indicator, the system may have to re-learn if new tyres are fitted.