Luggage compartment
Introduction
Section titled “Introduction”This chapter contains information on the following subjects:
- Folding the rear seat cushion and backrest
- Luggage compartment cover
- Variable luggage compartment floor
- Lashing eyes
- Bag hook
Always place heavy loads in the luggage compartment and ensure that the rear backrests are secured in the upright position. Always use the lashing eyes with suitable straps. Never overload the vehicle. Both the size of the load and its distribution in the vehicle affect handling and braking performance ⇒ .
Additional information and warnings
Section titled “Additional information and warnings”So that stale air can escape from the vehicle, the ventilation slots below the loading edge near the first-aid kit must not be covered.
Folding the seat cushion and backrests on the rear bench seat forwards and backwards
Section titled “Folding the seat cushion and backrests on the rear bench seat forwards and backwards”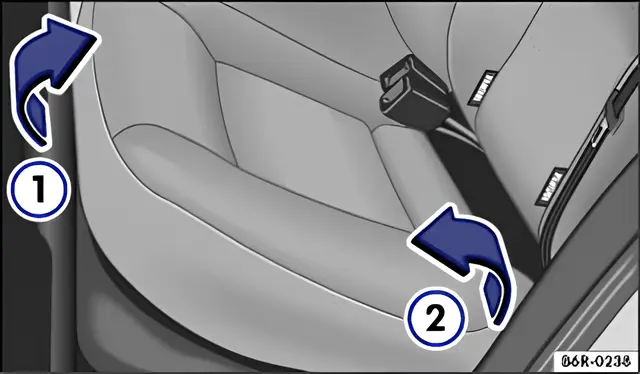
Fig. 83 Rear seats: folding the rear seat cushion forwards
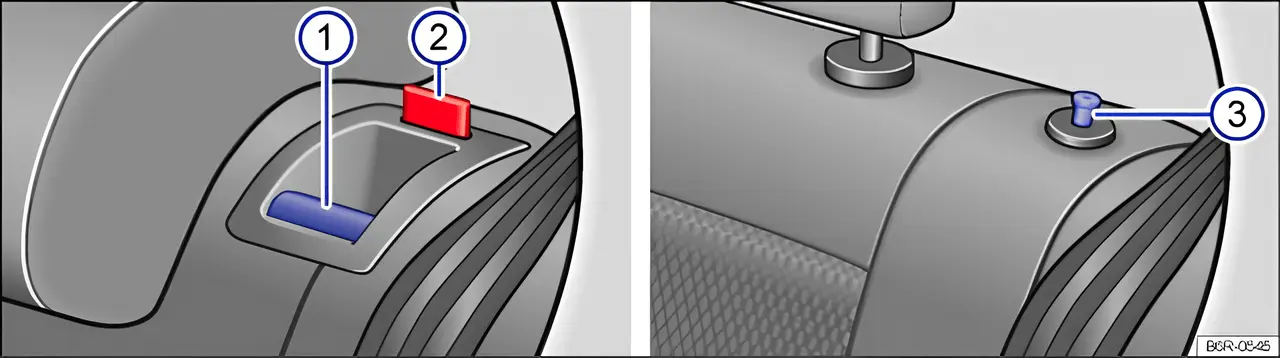
Fig. 84 Rear seats: release button 1, red marking 2 or release button 3.
First read and observe the introductory information and safety warnings .
The rear seat cushion and backrest can be folded forwards to increase the capacity of the luggage compartment.
Folding the rear seat cushions forwards
Section titled “Folding the rear seat cushions forwards”- Pull the rear seat cushion up by its front edge in the direction of the arrow ⇒ fig. 83 1.
- Fold the rear seat cushion forwards in the direction of arrow 2.
Folding the rear seat backrest forwards
Section titled “Folding the rear seat backrest forwards”- Push the head restraint all the way down, or remove it if necessary ⇒ Removing and fitting head restraints.
- Pull release button ⇒ fig. 84 A forwards, or pull release button C upwards, and at the same time fold the rear backrest forwards. On one-piece backrests, both switches or release buttons must be pulled at the same time.
- The rear backrest is released when the red marking on the release button is visible B.
- When the rear backrest is folded forwards, no adults or children may be carried on the folded seats.
Folding back the rear seat backrest
Section titled “Folding back the rear seat backrest”- Fold the rear backrest back and push it firmly into the catch until it engages ⇒ .
- The red marking 2 on the release button, or on the release buttons, must no longer be visible.
- The rear backrest must engage properly.
- Refit the head restraint if necessary and adjust it to suit the height of the occupant ⇒ Removing and fitting head restraints.
Folding the rear seat cushion back
Section titled “Folding the rear seat cushion back”- Tilt the rear seat cushion back and feed the belt buckle, and the lap belt if fitted, in underneath.
- Press the rear seat cushion down by its front edge until it audibly engages.
Luggage compartment cover
Section titled “Luggage compartment cover”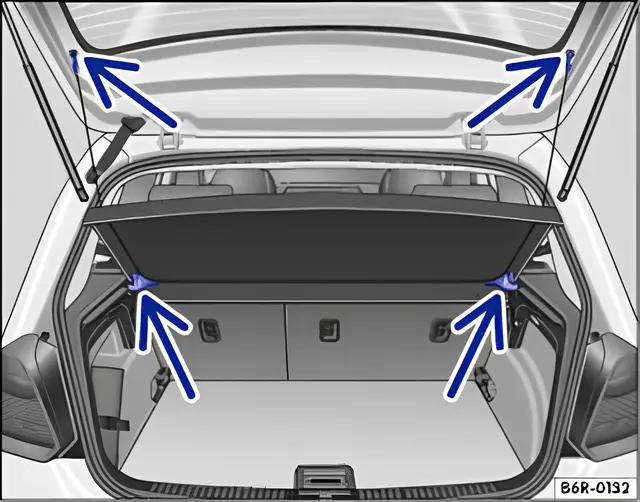
Fig. 85 Tailgate open: luggage compartment cover raised
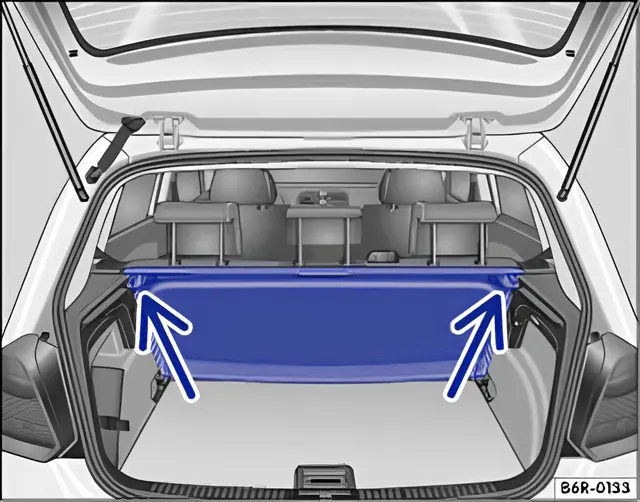
Fig. 86 Behind the rear backrest: luggage compartment cover stowed
First read and observe the introductory information and safety warnings .
When the retaining straps are attached, the luggage compartment cover is raised or lowered as the tailgate is opened and closed.
Light items of clothing may be placed on the luggage compartment cover. Ensure that the view to the rear is not restricted.
Removing the luggage compartment cover
Section titled “Removing the luggage compartment cover”- Unhook the retaining straps from the tailgate ⇒ fig. 85 A (upper arrows).
- Pull the luggage compartment cover backwards out of the side mountings ⇒ fig. 85 A (lower arrows).
Stowing the luggage compartment cover
Section titled “Stowing the luggage compartment cover”- Turn the luggage compartment cover round so that the edge with the retaining straps faces forwards.
- Release the rear backrest and tilt it forwards slightly.
- Slide the luggage compartment cover between the rear backrest and the outer wheel housing trims.
- Hook the luggage compartment cover into the side mountings and push it forwards ⇒ fig. 86 (arrows).
- Fold the rear backrest back until it engages in its catches.
Fitting the luggage compartment cover
Section titled “Fitting the luggage compartment cover”- Slide the luggage compartment cover forwards into the side mountings ⇒ fig. 85 (lower arrows) Hook the retaining straps onto the tailgate ⇒ fig. 85 (upper arrows)
Variable luggage compartment floor
Section titled “Variable luggage compartment floor”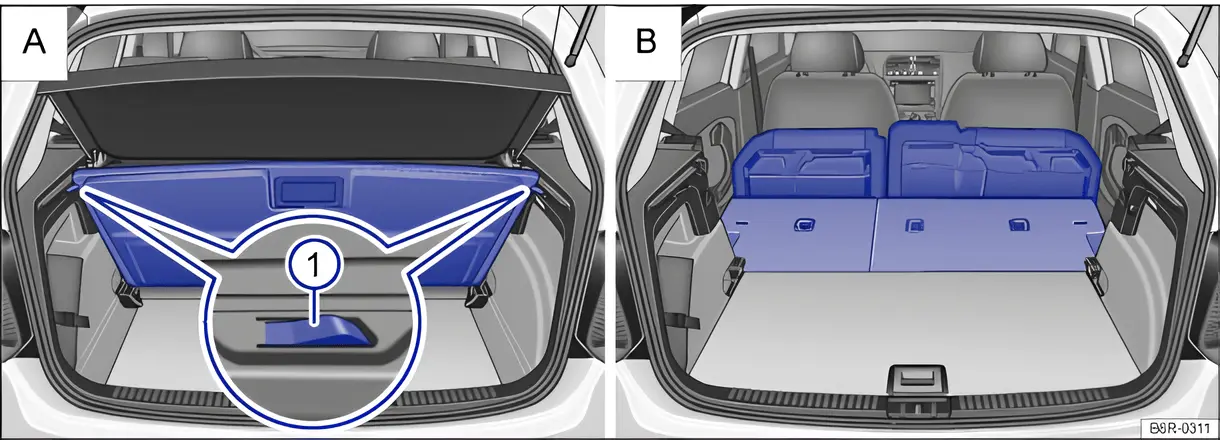
Fig. 87 A: variable luggage compartment floor folded up and secured; B: luggage compartment extended forwards
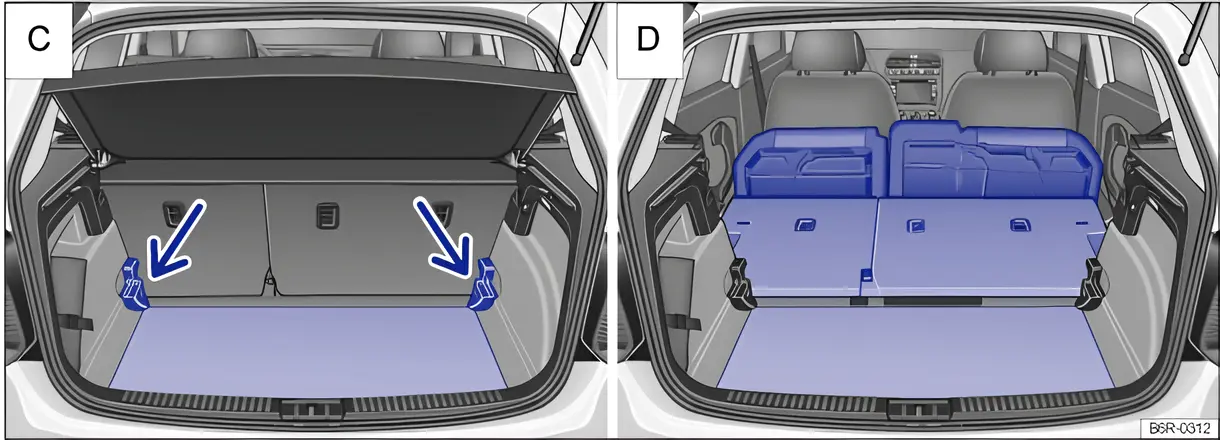
Fig. 88 C: luggage compartment extended downwards; D: maximum luggage compartment created
First read and observe the introductory information and safety warnings .
The variable luggage compartment floor can be used to extend the luggage compartment in several ways ⇒ .
Small objects can be kept in the stowage compartment underneath the variable luggage compartment floor.
Example A: Opening stowage compartment
Section titled “Example A: Opening stowage compartment”Take hold of the handle and push the luggage compartment floor all the way up over the catches ⇒ fig. 87 1 to secure it.
Example B: Extending the luggage compartment to the front
Section titled “Example B: Extending the luggage compartment to the front”- Remove the luggage compartment cover
- Push the rear head restraints all the way down ⇒ Adjusting the head restraints
- Fold the seat cushion and backrest forwards
Example C: Expanding the luggage compartment down
Section titled “Example C: Expanding the luggage compartment down”- Lift the luggage compartment floor at the rear and slide it under the guide ⇒ fig. 88 (arrows).
- Lay the luggage compartment floor on the floor covering.
Example D: setting the maximum luggage space
Section titled “Example D: setting the maximum luggage space”- Extend the luggage compartment forwards ⇒ Example B: extending the luggage compartment forwards
- Extend the luggage compartment downwards ⇒ Example C: extending the luggage compartment downwards
Fastening rings
Section titled “Fastening rings”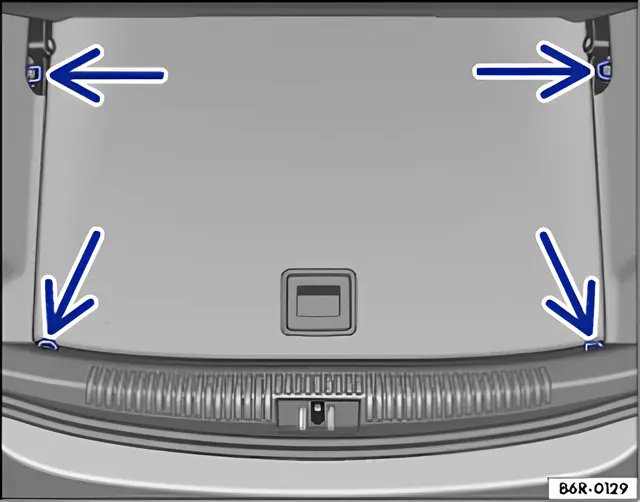
Fig. 89 In the luggage compartment: lashing eyes
First read and observe the introductory information and safety warnings .
There are lashing eyes at the front and rear of the luggage compartment for securing items of luggage ⇒ fig. 89 (arrows).
The maximum load of the lashing eyes is approximately 3.5 kN.
Suitable lashing straps and load securing systems are available from qualified workshops. Volkswagen recommends using a Volkswagen dealership for this purpose.
Bag hook
Section titled “Bag hook”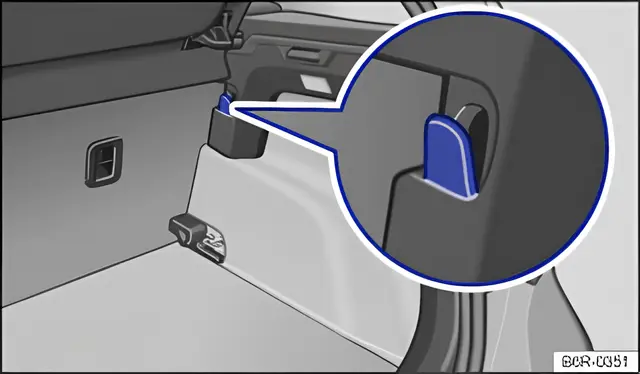
Fig. 90 In the luggage compartment: bag hook
First read and observe the introductory information and safety warnings .
There may be bag hooks on the left and right in the luggage compartment, on which light shopping bags can be hung ⇒ fig. 90.